In this tutorial, we will delve into the advanced features of the Team2Book Availability Calendar app. We’ll specifically focus on the ‘Global sub-calendar permissions’ and ‘Extra Sub-Calendars’ tabs within the client dashboard. These features offer enhanced control and efficiency in managing sub-calendar permissions and additional sub-calendars.
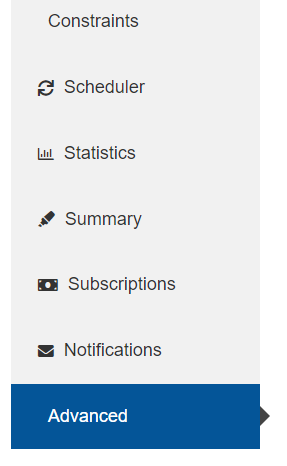
Accessing the Advanced Menu:
To access the Advanced Menu in Team2Book, follow these steps:
- Log in to your Client Manager Team2Book account. Upon logging in, you’ll be directed to the homepage.
- Find the “Members Area” tab on the homepage and click on it.
- Inside the Members Area, locate and click on “Client Dashboard” in the menu.

- Navigate to the bottom left corner of the Client Dashboard. You’ll find an option labeled “Advanced.” Click on it to access the Advanced Menu.
Now, let’s explore the advanced features:
Global Sub-Calendar Permissions:
The ‘Global sub-calendar permissions’ feature offers a streamlined approach to modifying sub-calendar permissions for multiple users and calendars simultaneously. Instead of individually navigating to each user’s dashboard to make changes, ‘Global sub-calendar permissions’ allows you to update, delete, or alter sub-calendars permissions for users efficiently.
- Understanding Sub-Calendar Permissions: Teamup displays multiple sub-calendars, each with different access permissions. Client Managers can decide whether a consumer or viewer should have read or modify access to each sub-calendar.
- Accessing the Global Sub-Calendar Permissions Tab: Once in the Advanced Menu, locate and click on the ‘Global sub-calendar permissions’ tab.
- Setting Permissions: In this tab, you can select multiple sub-calendars and multiple users to set permissions. This eliminates the need to edit permissions individually for each consumer or viewer, saving time and effort, especially with a large number of consumers and sub-calendars.
- Submitting Permissions: After selecting the desired sub-calendars and users, submit the form to apply the permissions globally.
Let’s see one by one.
How to Use:
To utilize the ‘Global sub-calendar permissions’ feature, follow these steps:
- Navigate to the “Advanced” section in the client dashboard and click on “Advanced.”
- Tap on ‘Global sub-calendar permissions’ to access the feature.
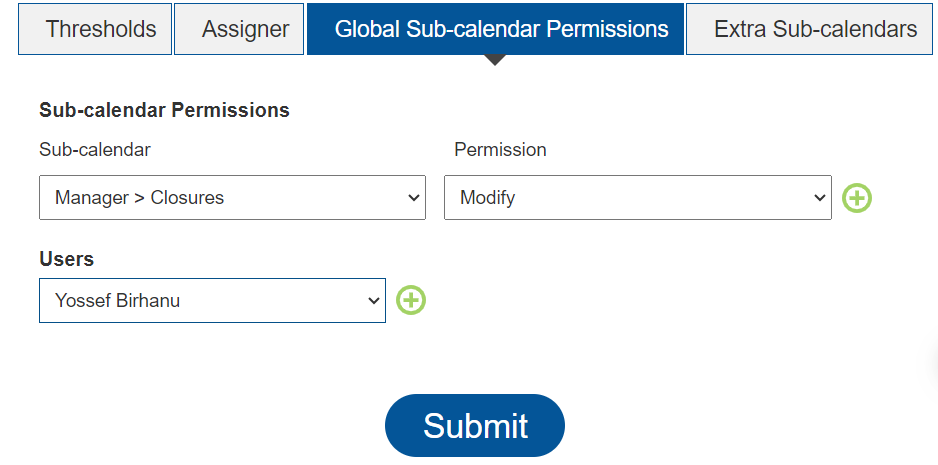
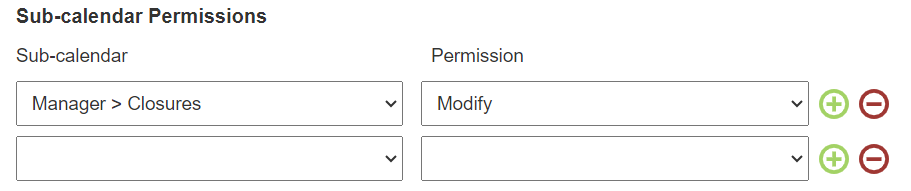
- Within the ‘Global sub-calendar permissions’ interface, you’ll find two main sections: “Sub-calendar Permissions” and “Users.”
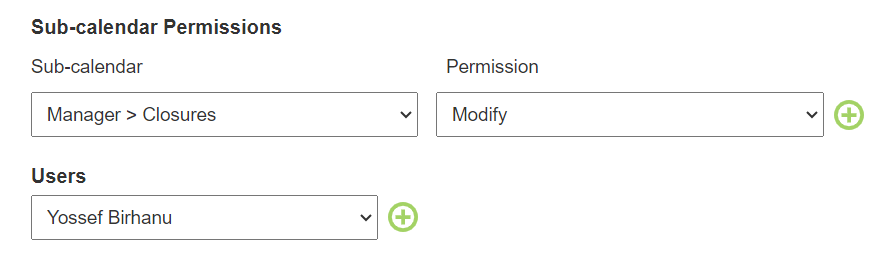
- In “Sub-calendar Permissions”:
- Under “Sub-calendar,” select the specific sub-calendar for which you want to adjust permissions. All available sub-calendars will be listed.
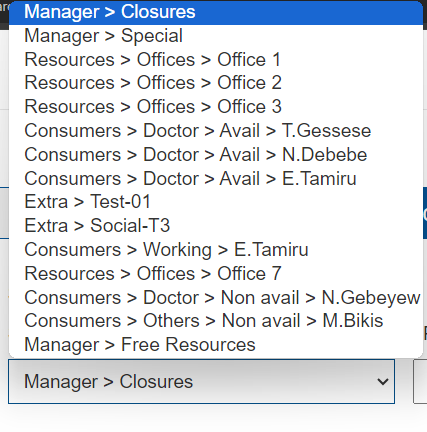
- Choose the desired sub-calendar by clicking on it.
- In the “Permission” dropdown menu, select one of three options:

- “Read-only”: Grants permission to view the shared sub-calendar only.
- “Modify”: Allows the user to modify or make changes to the shared sub-calendar.
- “No-shared access”: Provides no access to the selected sub-calendar, with neither viewing nor updating options available to the user.
- To add more sub-calendar, click the plus sign and select additional sub-calendar.
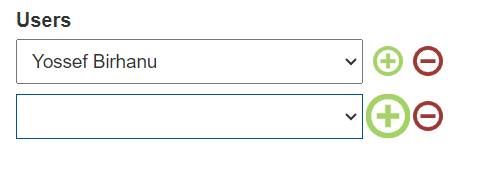
- In the “Users” section:
- Click on the user to whom you want to grant access or permission to the sub-calendar.
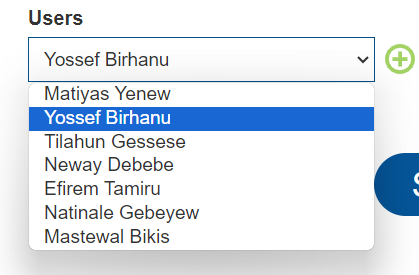
- To add more users, click the plus sign and select additional users.
- Once you’ve selected the sub-calendar and assigned permissions to users, click “Submit” to save your changes.
By following these steps, you can efficiently manage sub-calendar permissions for multiple users and calendars within the Team2Book platform.
Extra Sub-Calendars:
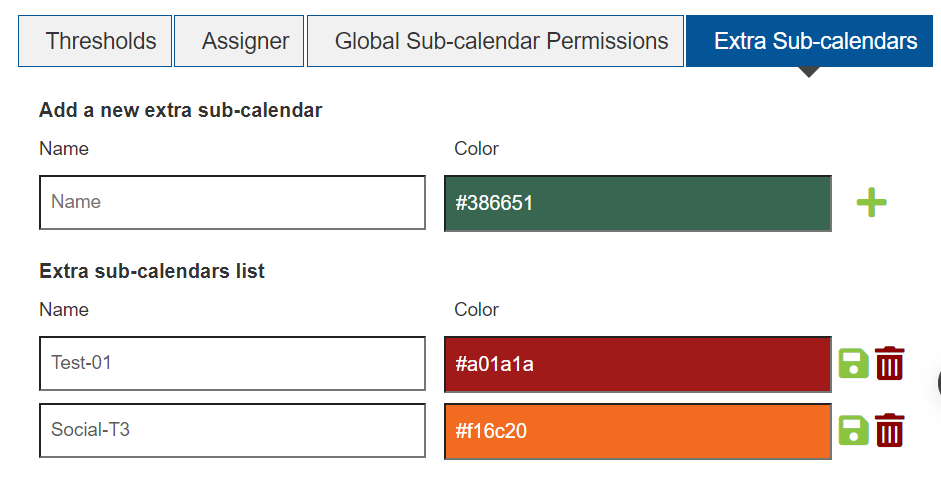
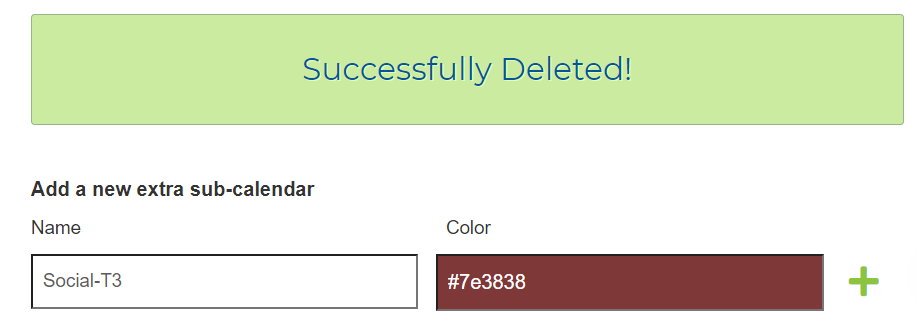
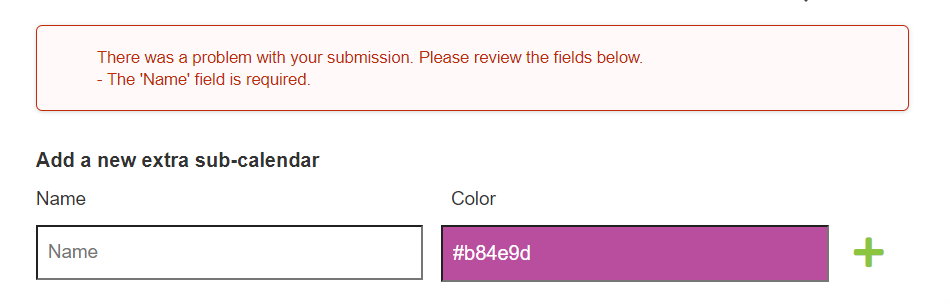
The advanced tab also features the ‘Extra Sub-Calendars’ feature, which provides users with the ability to add additional calendars for various general purposes. This feature allows users to expand beyond the standard sub-calendars provided by default. ‘Extra Sub-Calendars’ encompasses two main functionalities: ‘Add a new extra sub-calendar’ and ‘Extra sub-calendars list.’ In the ‘Add a new extra sub-calendar’ section, users can define the name and choose the color of the sub-calendar, and upon clicking the plus sign, the extra sub-calendar will be created.
How to Use:
The Extra Sub-Calendars tab in the Team2Book Advanced Menu offers users the flexibility to add and manage additional calendars for various purposes.
Let’s explore each feature one by one.
- Navigate to the Advanced Menu: To begin, access the Advanced Menu within your Team2Book dashboard.
- Within the Advanced Menu, find and click on the ‘Extra Sub-Calendars’ tab.

- Once you’re in the ‘Extra Sub-Calendars’ tab, you’ll see options to add new sub-calendars. Specify the name and color for each new sub-calendar according to your requirements.

- After specifying the details, proceed to create the new sub-calendar by clicking on the designated option, such as a plus sign or ‘Create.’

Once you’ve added new sub-calendars, you can manage them alongside the default ones.
- The newly added sub-calendars will be listed in the ‘Extra sub-calendars list.’
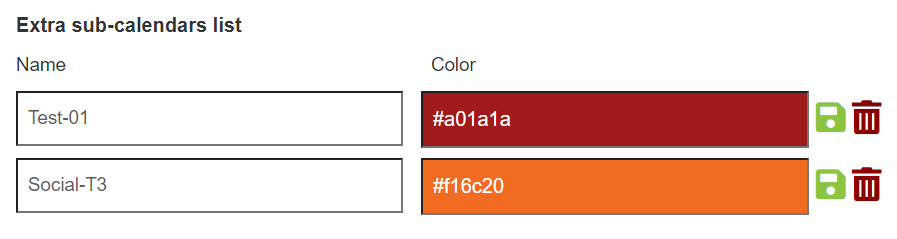
- Within the list, locate the extra sub-calendar you wish to modify. Click on the corresponding options to change either the name or the color of the sub-calendar. After making updates to the name or color, ensure to click the ‘Save’ button to apply the changes effectively.

- If you wish to remove an extra sub-calendar, locate it within the ‘Extra sub-calendars list.’ In front of the extra sub-calendar you intend to delete, click on the ‘Delete’ button.

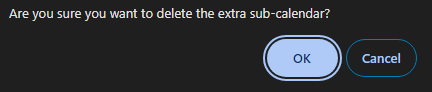
Once confirmed, the extra sub-calendar will be deleted from the list and removed from your scheduling dashboard.
These created or added extra sub-calendars will be visible in the scheduled dashboard under the category of Extra sub-calendar, just like other sub-calendars. This feature provides flexibility and customization options to tailor the scheduling experience according to specific requirements.

Additionally, it’s important to note that Team2Book will ignore the events associated with these extra sub-calendars. While extra sub-calendars offer versatility for various purposes, such as marking special events, holidays, or team-specific schedules, they are primarily intended for organizational purposes rather than active event management. Users should utilize these additional sub-calendars to categorize and manage different types of events or activities within their scheduling system effectively, understanding that events created within these extra sub-calendars will not be processed by Team2Book.
Permissions:
By default, the Extra Sub-Calendars permissions are ‘Modify’ for the Client Managers and ‘Read-only’ for the consumers and viewers. If you need, feel free to change the Extra Sub-Calendars Permission to ‘Modify’ or ‘Not Shared (No access)’ for consumers and viewers.
To proceed, you can edit each user individually or you can use the Global Sub-Calendar Permissions described above.
Please note that if you provide ‘Modify’ permission to a consumer, this consumer will now need to select which sub-calendar to use while creating a new event. If this consumer has only ‘Modify’ permission to his availability sub-calendar, Teamup automatically selects this sub-calendar while creating a new event.
Creating Sub-Categories with Extra Sub-Calendars
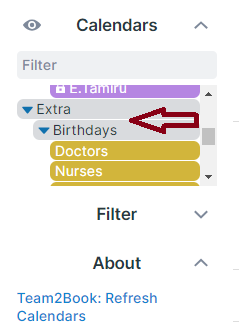
If users wish to categorize their extra sub-calendars based on specific requirements, Team2Book offers the flexibility to do so. Users can create sub-categories by inserting the special character “>” in the sub-calendar name.

For instance, if a user wants to add an extra sub-calendar to categorize team birthdays, they can create sub-calendars like “Birthdays > Doctors,” “Birthdays > Nurses,” and “Birthdays > Secretaries.”
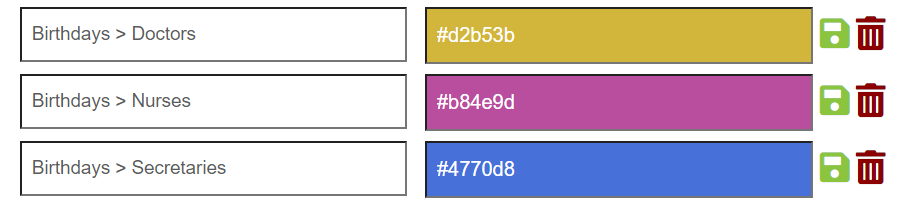
As a result, “Birthdays” will be the main category, while “Doctors,” “Nurses,” and “Secretaries” will be sub-categories displayed within the scheduler dashboard.
Extra Sub-Calendars Validation:
When creating or adding extra sub-calendars, it’s essential to adhere to certain validation criteria to ensure smooth functioning within the Teamup Subscription. Here are the key validation checks:
- Subscription Limit Check:
The number of extra sub-calendars should not exceed the limit set by your Teamup Subscription plan. If the limit is exceeded, a validation message will be displayed, indicating the need to upgrade the subscription.
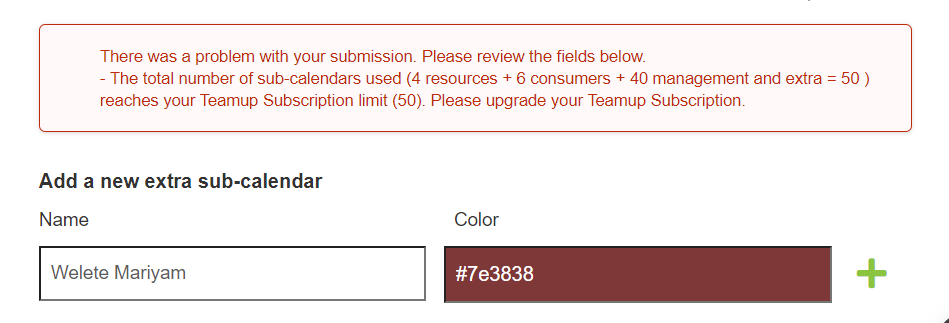
The number of allowed sub-calendars must adhere to the limitations set by the user’s Teamup plan. This includes considering the total number of consumers, resources, management, and extra sub-calendars. Specifically, the sum of these categories (# of consumers + # of resources + # of management or Extra) must not exceed the total number of sub-calendars allowed in the user’s Teamup plan. This ensures compliance with subscription constraints and prevents exceeding the allocated resources for sub-calendar creation.
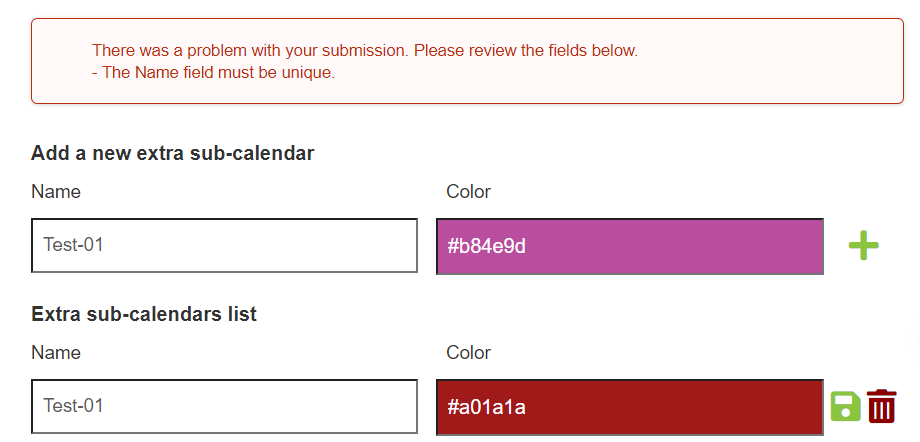
- Unique Name Requirement:
The name field for each extra sub-calendar must be unique. If the system detects a duplicate name, it will display a validation message informing the user that the name is already in use.
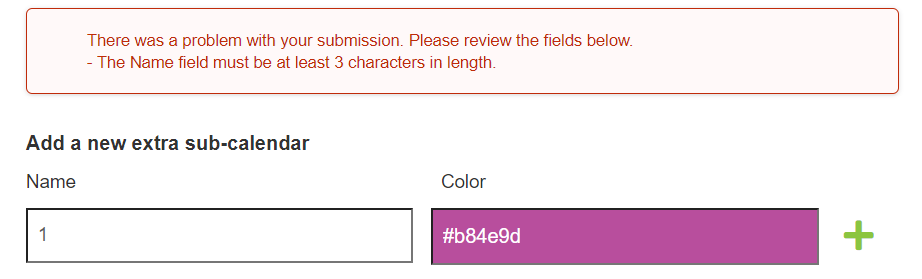
- Name Field Length Check:
Each extra sub-calendar must have a name that is at least 3 characters in length.
If the user leaves the name field empty, the system will prompt them to input a name for the sub-calendar.
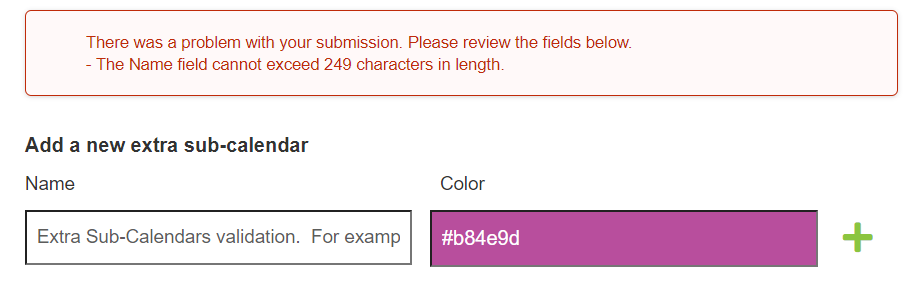
Additionally, if the name exceeds the maximum length of 249 characters, a validation message will indicate that the name is too long.
Conclusion:
In conclusion, the ‘Global sub-calendar permissions’ and ‘Extra Sub-Calendars’ features within Team2Book’s advanced module offer valuable tools for streamlining scheduling processes and enhancing organizational efficiency. With ‘Global sub-calendar permissions,’ users can efficiently manage permissions for multiple users and calendars simultaneously, saving time and effort. Meanwhile, ‘Extra Sub-Calendars’ provide flexibility by allowing users to add and customize additional sub-calendars for various purposes, improving overall clarity and organization within the scheduling system. By leveraging these advanced features, users can optimize their scheduling experience and achieve greater control over their calendar management tasks.