Introduction
Team2Book is a calendar availability app. In this tutorial, we will delve into the specifics of the Individual Membership Plan, a unique offering distinct from our regular membership plans (Free, Plus, Pro, Business, and Enterprise). The Individual Membership Plan caters to a more personalized approach, allowing individual consumers to enjoy the benefits of Team2Book without the need for organizational subscriptions.
Understanding Individual Membership Plan
- Definition and Purpose
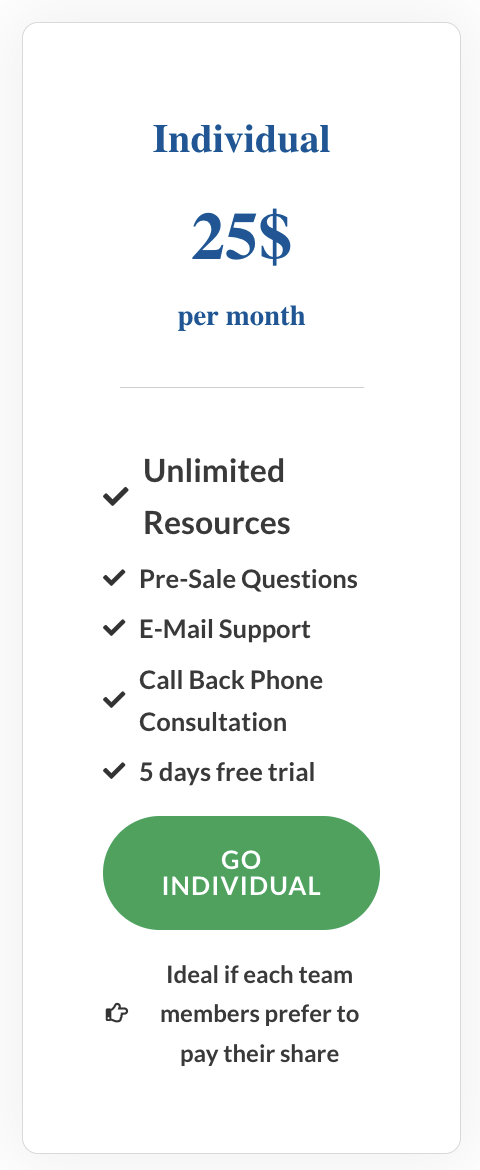
The Individual Membership Plan is designed to cater to users who prefer a personalized subscription model. It allows individual consumers to pay a monthly fee of $25, granting them access to Team2Book’s features and benefits.
- Target Audience
Individuals or team members who are not part of an organization utilizing our regular membership plans can opt for the Individual Membership Plan. This is an ideal solution for those who want to manage their subscriptions independently.
- Flexibility and Independence
Unlike the regular membership plans where an organization’s principal manager subscribes on behalf of the entire team, the Individual Membership Plan offers flexibility, allowing each team member to pay their share independently.
Key Differences from Regular Membership Plans
- Ownership and Payment Structure
In the Individual Membership Plan, each consumer is responsible for their subscription, fostering a sense of ownership. This differs from the regular plans where the organization’s manager handles the payment.
- Ideal Scenarios for Individual Membership
The Individual Membership Plan is perfect for scenarios where team members prefer individual responsibility for their subscription fees, making it an excellent choice for small teams without an organization structure in place to pay for common expenses.
- Features and Limitations
While the core features remain consistent, some administrative features available in regular plans may be limited in the Individual Membership Plan.
Creating an Individual Membership for Team2Book calendar availability app
To set up your Individual Membership on Team2Book calendar availability app, follow these step-by-step instructions:
- Visit Team2Book.com
Open your web browser and navigate to Team2Book.com.
- Navigate to Individual Plan
Once on the homepage, locate the “Plans” section from the main menu. Click on “Click here to see our individual plan.”

- Subscribe to Individual Membership
In the Individual Membership pop-up, click on the “Go” button. Enter your card details for the $25 monthly subscription or check out our yearly subscription at 15% discount. After entering your card details, click the “Sign Up Now” button.
- Client Set-Up Page:
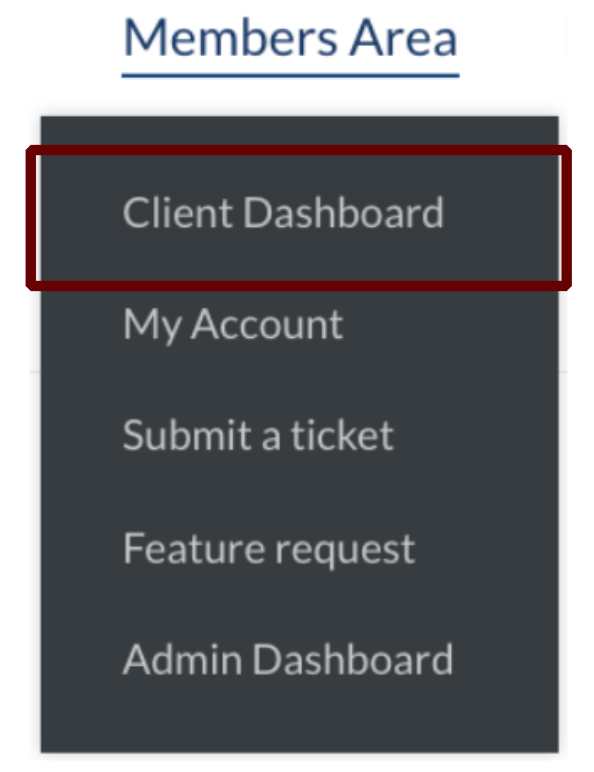
Head out to the Members Area and select “Client Dashboard”.
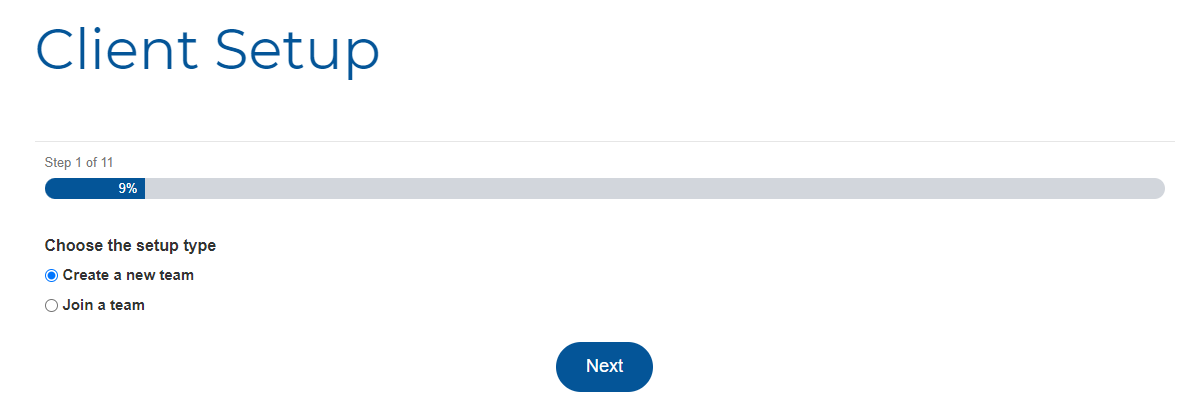
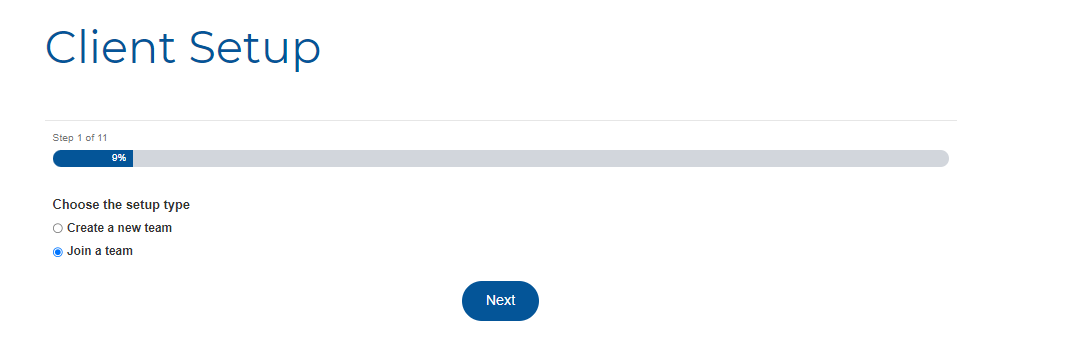
- A new client set-up page will appear. Choose the set-up type
- If you are creating a new client setup, click the radio button next to “Create a new team” and click “Next.”
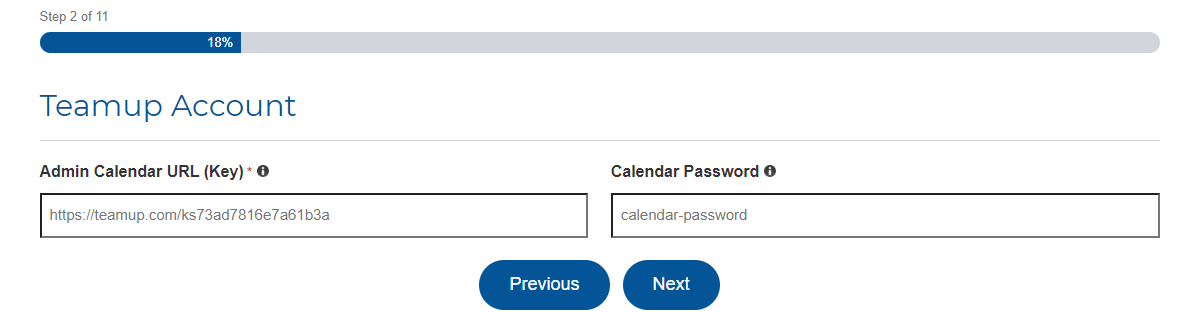
- Enter Teamup Account Details
- Enter your Team Up Account details, including the Admin Calendar URL (Key) and Calendar Password. If you need help please check out our video called “Install your Teamup Administrator Key”.
- Click “Next.”
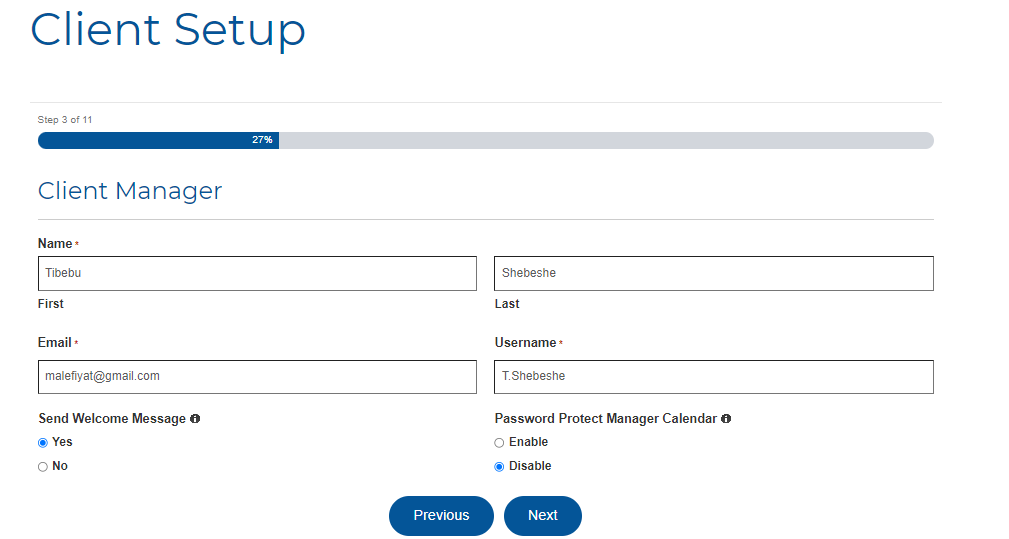
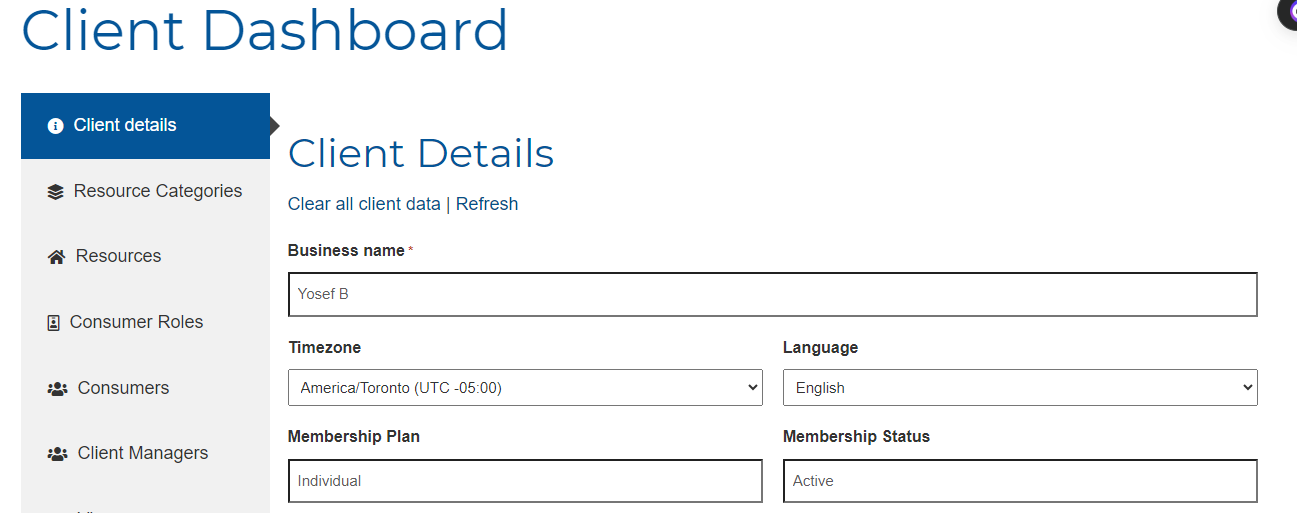
- Client Details
- Enter your client details. Note that if you are creating the client setup, you will be the principal client manager by default.
- Click “Next.”
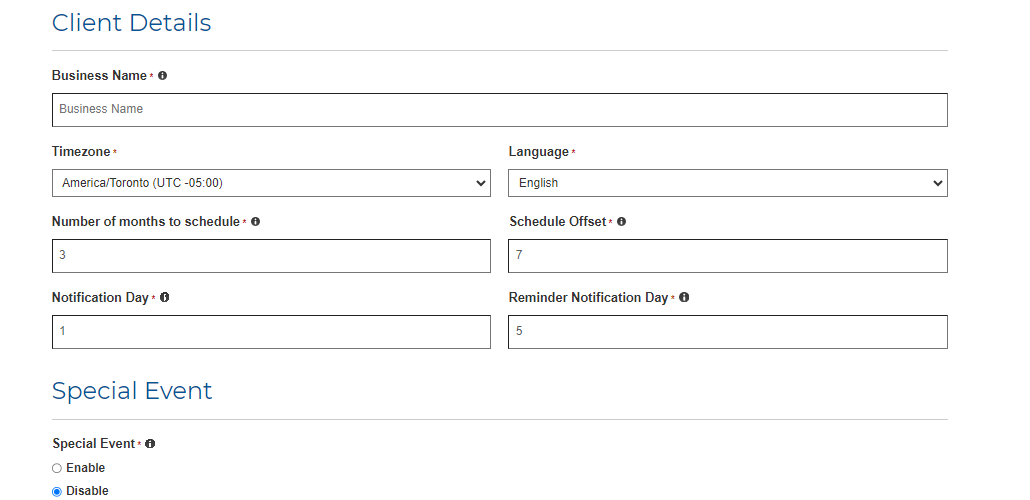
- Business Details
- Name your business, set timezone, language, and other details. Specify special events, opening and closing days, and times.
- Click “Next.”
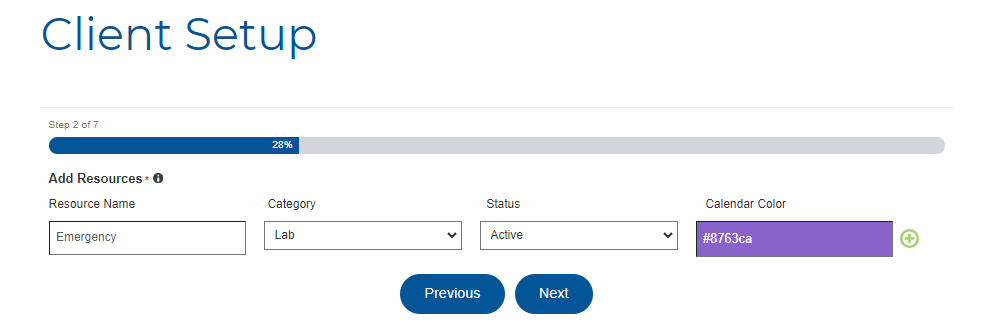
- Add Resources
- Add resource categories to group your resources (e.g., Office1, Office2). Specify calendar color for each resource.
- Click “Next.”

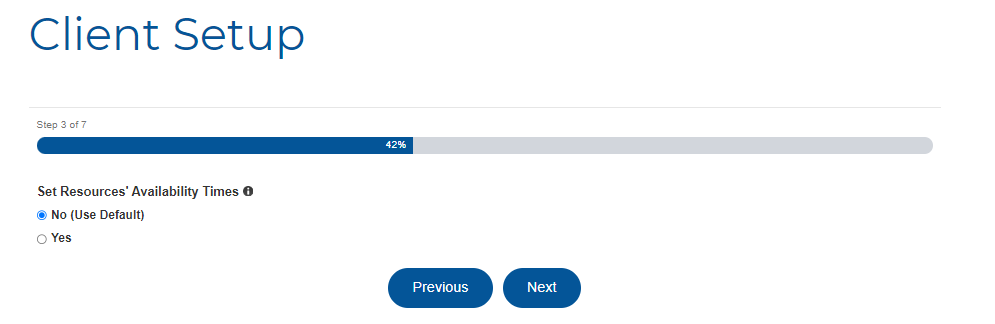
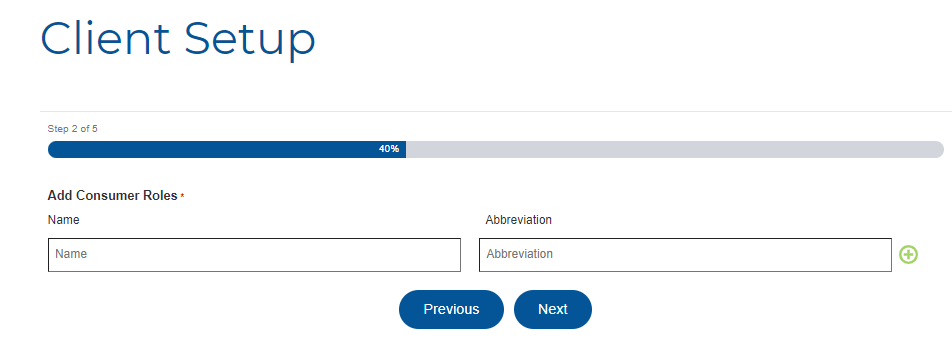
- Consumer Roles and Details
- Add consumer roles and details, selecting priorities.
- Click “Next.”
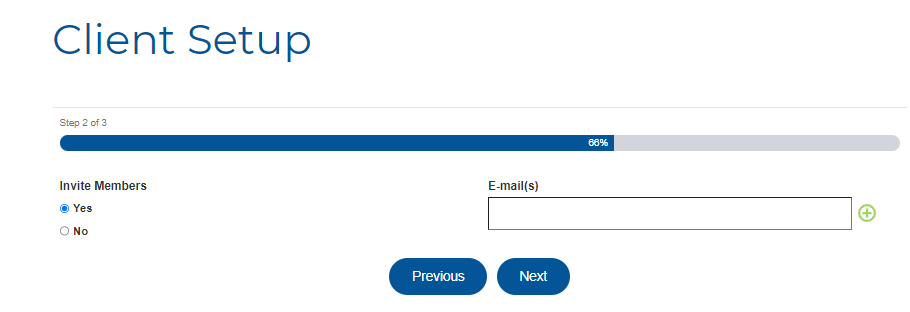
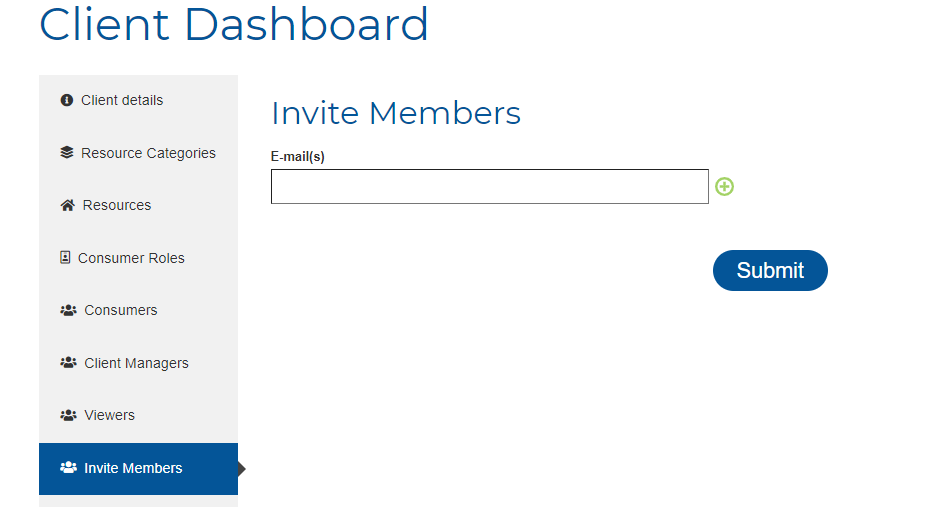
- Send Invites to Teams
- Choose whether to send invites via email to your team members. Click the “Yes” radio button if you want to invite.
- Click “Next.”
- Complete Setup
- Click “Finish” to complete the setup.
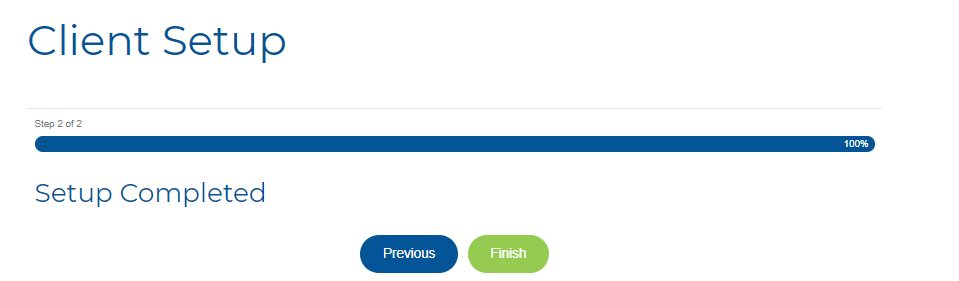
- You’ll be directed to the client dashboard.
Major Differences with Regular Memberships of Team2Book calendar availability app
- In the Individual Membership Plan, you cannot add new consumers in the consumer dashboard. You are both a consumer and a principal client manager in the Individual Membership Plan. Consumers are created by default when they join the team in the Individual Membership Plan.

- The principal client manager can send invitation links to stakeholders or the team. There is no “Invite Member” tab in the regular membership plan.
By following these steps, you’ve successfully set up your Individual Membership on Team2Book calendar availability app, offering a personalized experience for managing your team and resources.
Joining an Existing Individual Membership on Team2Book
If you’ve received an invitation to join an existing Individual Membership on Team2Book calendar availability app, follow these simple steps:
- Visit Team2Book.com
Open your web browser and go to Team2Book.com.
- Navigate to Individual Plan
Locate the “Plans” section on the homepage. Click on “Click here to see our individual plan.”
- Subscribe to Individual Membership
In the Individual Membership pop-up, click on “Go.” Enter your card details for the subscription. After entering your card details, click the “Sign Up Now” button.
- Client Set-Up Page
Head out to the Members Area and select “Client Dashboard”.
- Once you’ve signed up, a new client set-up page will appear.
- Choose the set-up type: If you want to join an existing team, click the radio button next to “Join a team” and click “Next.”
- Enter Invitation Code
- You will be prompted to enter the invitation code.
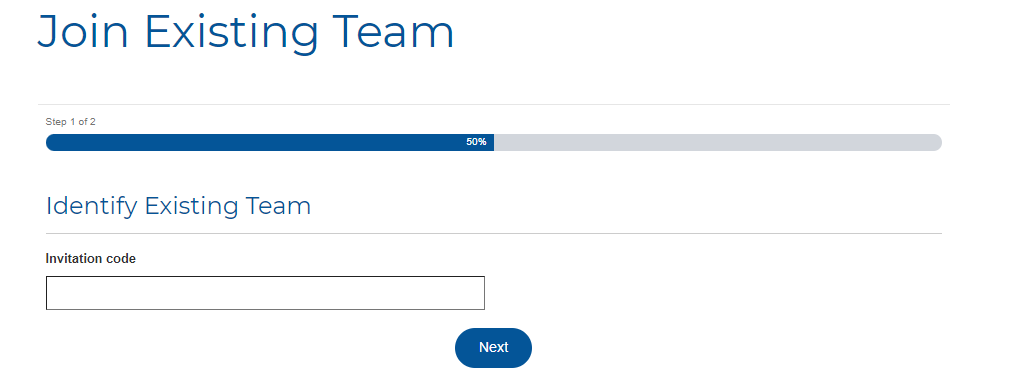
- Check your email for the “Invitation to Join Team2Book” message, copy the invitation code, and paste it into the provided field. Click “Next.”

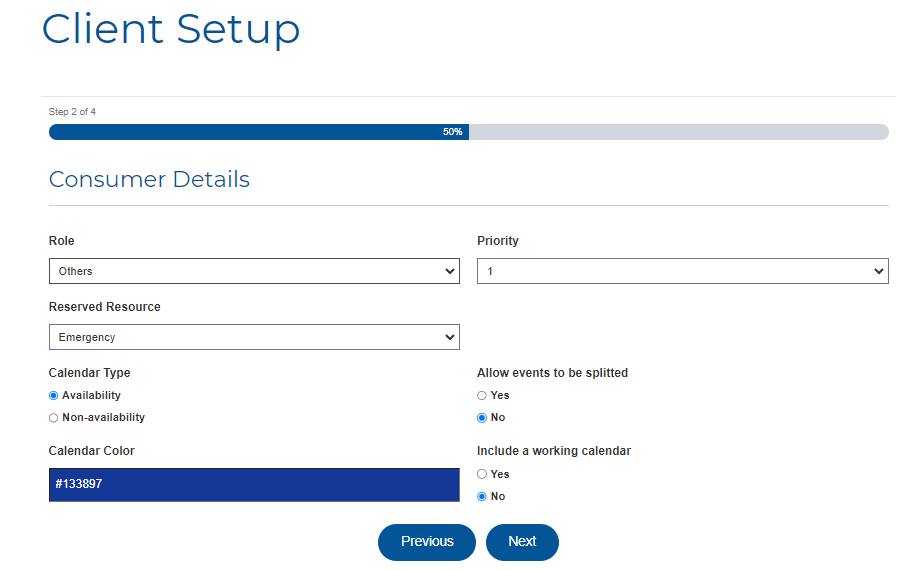
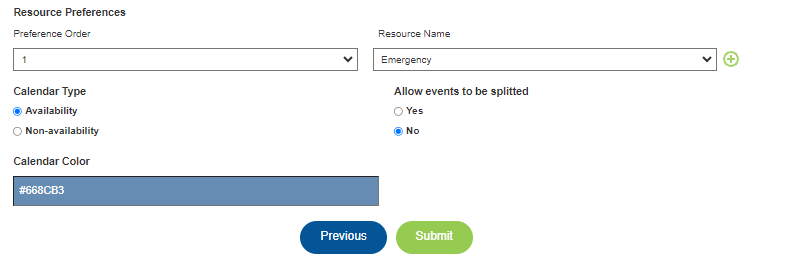
- Enter Personal and Consumer Details
- The final step is to enter your personal details and consumer details. Select your priority, resources preference, calendar type, and any other required consumer details.
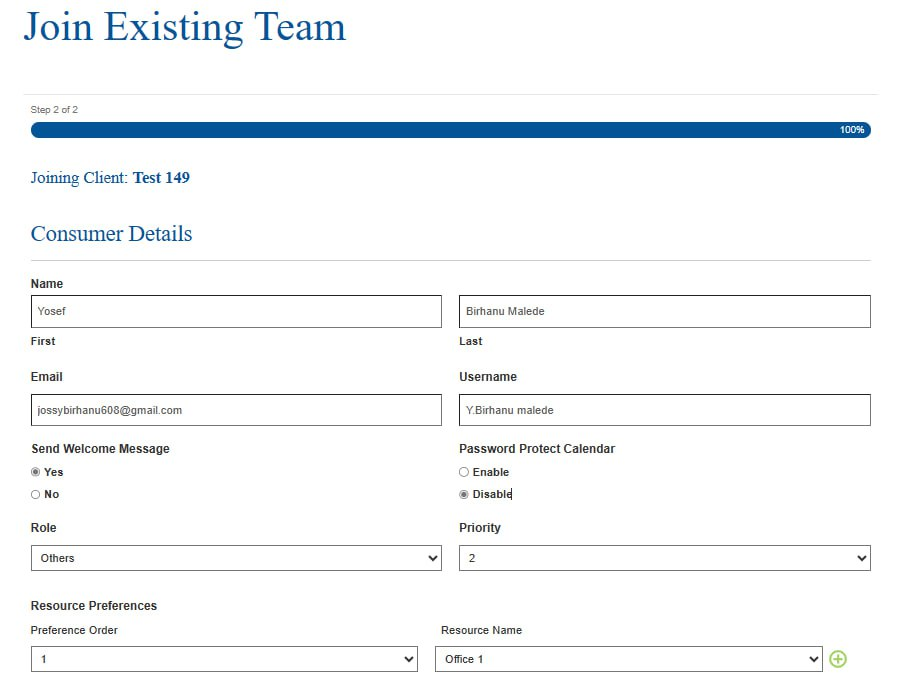
- Click “Submit.”
- Consumer Dashboard
- You have successfully joined the team. You will be redirected to your consumer dashboard.
- A confirmation message will notify you that you’ve added yourself as a consumer to the team.
Please note that as a consumer in an Individual Membership, your primary interaction with Team2Book will be through the consumer dashboard. Look out for your personalized Teamup access key in your email.

By following these steps, you’ve seamlessly joined an existing Individual Membership on Team2Book calendar availability app. Now, you can enjoy the benefits of the team’s resources and scheduling features.
New Features in Your Individual Membership Plan
These new features empower the Principal Client Manager with additional responsibilities to streamline team management.
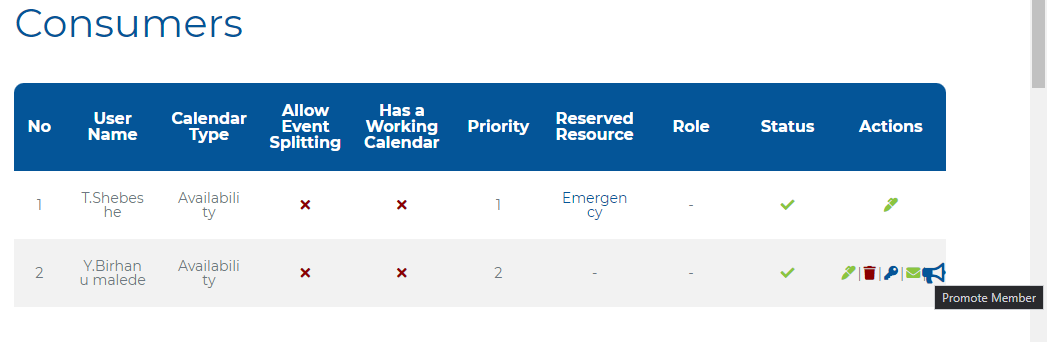
- Promotion and Demotion of Team Members
- The Principal Client Manager now has the ability to promote and demote members within the Consumer Dashboard.
- To promote a member to a Client Manager:
- Navigate to the Client Dashboard.
- Select the Consumer tab from the left menu.
- Locate the microphone button next to the member’s profile.
- Click the microphone button to promote the consumer to a Client Manager, using the Principal Client Manager credentials.
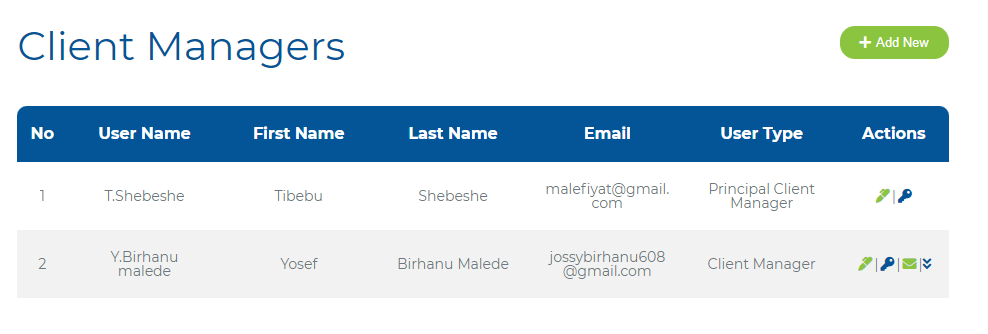
- Consumer and Principal Client Manager Roles
- Join members are automatically assigned the role of a consumer only.
- The first creator of the Individual Membership Plan holds the dual role of being both a consumer and a principal manager.
- Demotion to Consumer
- The Principal Client Manager also has the authority to demote individual members to consumers.
- To demote a Client Manager to a Consumer:
- Navigate to the Client Dashboard.
- Select the Client Managers tab from the left menu.
- Locate the down icon next to the Client Manager’s profile.
- Click the down icon to demote the Client Manager to a Consumer, using the Principal Client Manager credentials.
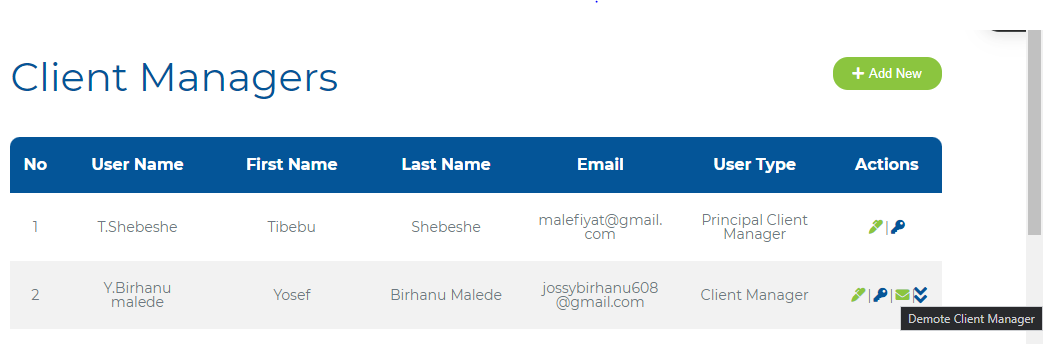
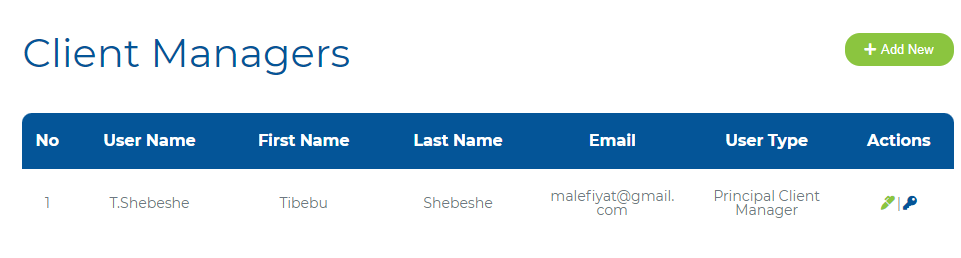
The promoted consumer will be removed from the client manager dashboard table.
These features provide more flexibility and control over team roles within your Individual Membership Plan.
Please note, the demoted client manager needs to have an active individual membership in order to continue to use Teamup and Team2Book as a consumer. If the client manager does not have an active individual membership, you will not see the demotion icon. You will instead see a remove icon.
Adding new client managers or viewers in Team2Book calendar availability app
Similarly to regular memberships, a client manager can add new client managers to help them in their tasks. The client managers can also add viewers to provide a viewing access to personnel that does not require a consumer sub-calendar.
Account Management in Your Individual Membership Plan
- Deactivation or Deletion Privileges
The Client Managers now have the privilege to modify the account details, add resources, add constraints or invite new members.
- Subscription Inactivity Protocol for the principal client manager
In the event that the Principal Client Manager is unable to pay the subscription or if the subscription remains inactive for a month, the system will automatically initiate the following actions:
- Automatically promote an active client manager with an active membership to the position of Principal Manager in the team.
- Automatically promote an active consumer to the position of Principal Manager in the team.
- If all consumers become inactive, the system will initiate the automatic deletion of the Individual Membership account.
- Subscription Inactivity Protocol for the consumer
In the event that the consumer is unable to pay the subscription or if the subscription remains inactive for a month, the system will automatically initiate the following actions:
- Remove access to the Team2Book Consumer Dashboard.
- Stop assigning resources or special events to this consumer.
- The consumer sub-calendar remains in case the consumer decides to re-activate his membership.
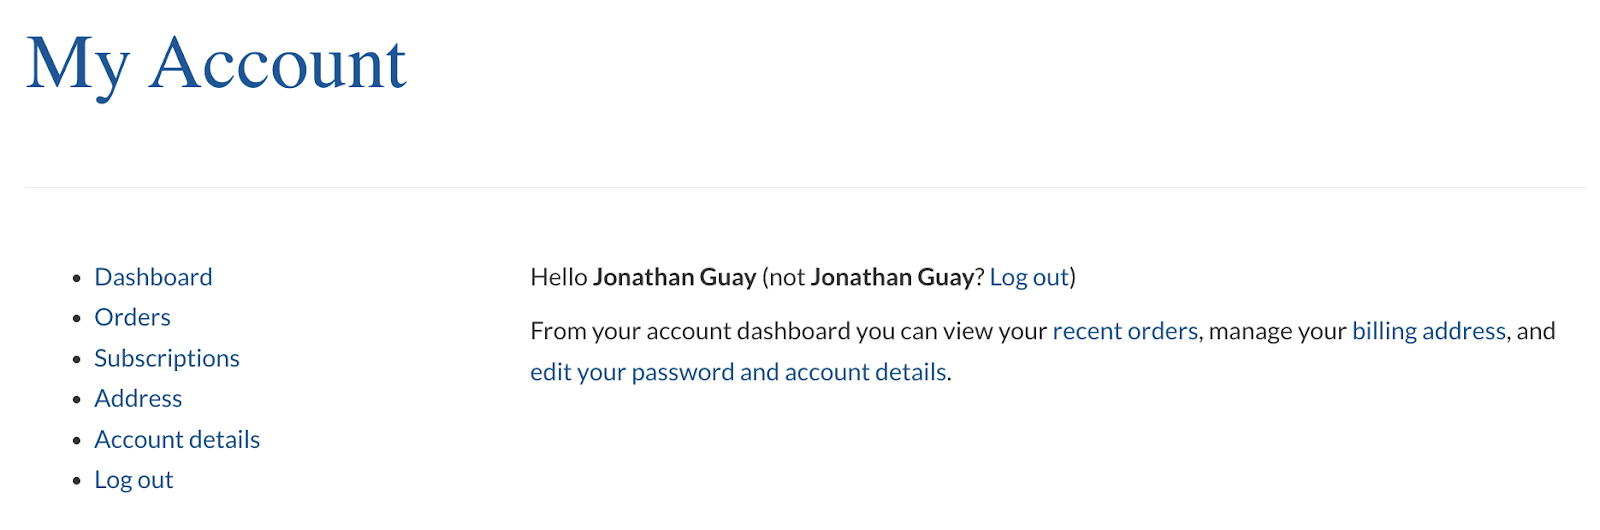
- Renewing or suspending your membership
Every individual membership owner can view or modify their membership details from the Members area.
To proceed, please, select ‘My Account’ from the Members Area of the main menu.
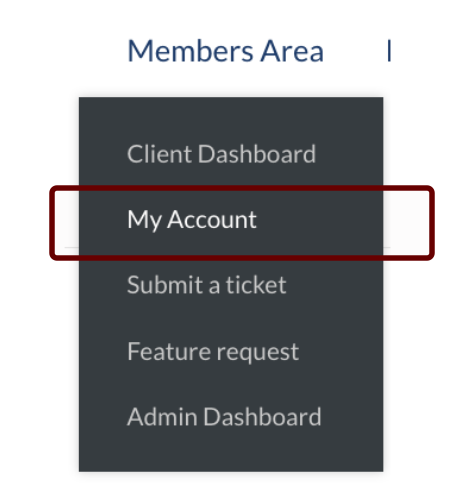
You will now have access to see your subscription and renew or cancel it.. You may also update your personal information.