The Clientdashboard scheduler menu UI
Introduction
Once the client manager and users set up the resource and the consumer information, the scheduler then uses this information to schedule the resources. This module is the user guide for the Clientdashboard scheduler menu UI that provides you with steps and instructions on how to run the scheduler and display the calendar in full window size.
In this section, you will be able to:
- Run the scheduler
- Open the Teamup Calendar into Full Screen
The Linked Teamup calendar view is available and the user might need to enter their password if the Teamup calendar is password protected.

Enter your calendar link password into the login mask. You can then view the Teamup User Interface directly from the Team2Book Scheduler Section of the Client Dashboard.
Here is how to get to the Clientdashboard scheduler menu UI :
- Log into your client Manager Team2Book account
- In the homepage of Team2Book, tab the Members Area.
- Click Client Dashboard in the left side of the Client Dashboard menu.
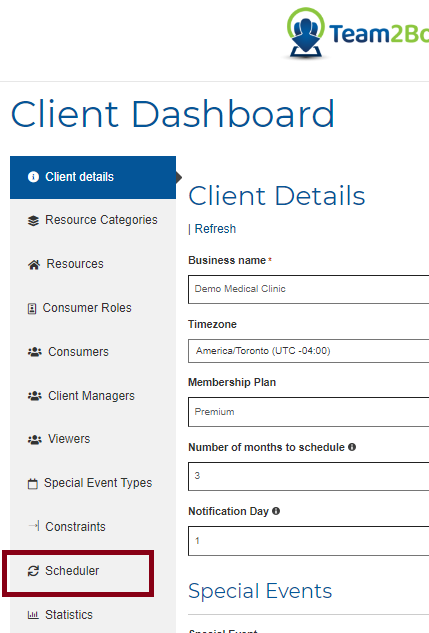
- In the left column, Click Scheduler. This is where you look at the Clientdashboard scheduler menu UI
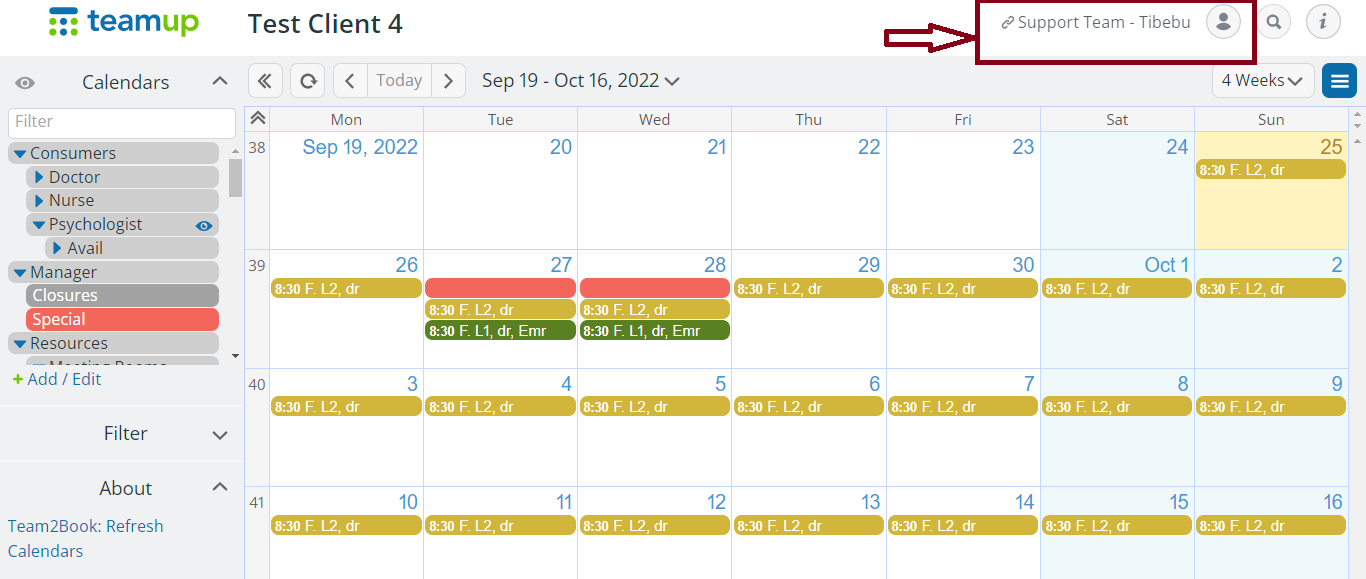
- The Clientdashboard scheduler menu UI can be found on top of the calendars

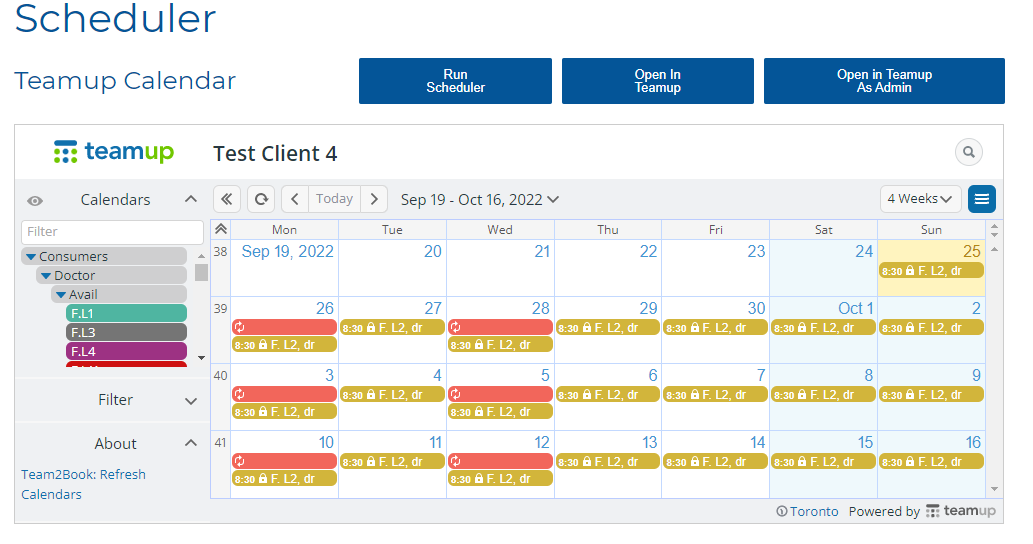
The scheduler User Interface (UI) overview
As soon as you log in to the Clientdashboard scheduler menu UI, the content of the scheduler UI will be displayed in the Teamup Calendar.

The user interface of the scheduler consists of the following action options and filters:
- Clientdashboard scheduler menu UI
- Teamup Calendar: On the left side, the navigation section of the Teamup calendar is allowing you to hide/show any sub-calendars.
- Teamup Sub-calendars. By clicking on the sub-calendar or a sub-calendar group, you can show/hide sub-calendars.
- Calendar refresh option: Clicking on the Team2Book: Refresh will reload the scheduler. This option has equal privilege with Run the scheduler UI. This allows any team members to run the scheduler while the ‘Run Scheduler’ button of the Client Dashboard is reserved to client managers.
- Common scheduling errors: presented below the scheduler
- Teamup Refresh option: Clicking on the symbol reload will refresh the calendar. Used to reload the schedule after a new run of the Scheduler.
- Time period: Option to display the calendar. Displays the range of time periods which you select to view the events.
- Time period filter options in terms of days, weeks, months and years to display the events. All the events which you select via the option will be displayed.
- Table: Option to display the events using a table view.
- Agenda: Option to display the events using an agenda view.
- List: Option to display the events using a list view.
- Time Zone.
- Search bar: By simply typing keywords into the search bar on top of the screen you will search through all of the Teamup calendar.
- The sub-calendars filters. You can filter sub-calendars by entering a filter criteria.
The Execution message area is found on the top of the Clientdashboard scheduler menu UI. The Execution Status Area displays all messages generated by the scheduler.
Scheduler Execution Message Area.

Display the result of the latest Scheduler Run.
Scheduler Menu
The Clientdashboard scheduler menu UI contains: Run Scheduler, Open In Teamup and Open in Teamup As Admin of the scheduler.

Run Scheduler
The Teamup scheduler updates itself every 15 minutes. However, If the client manager is anticipating to update the calendar, the Run Scheduler attribute allows the client manager to run the scheduler as they need by pressing this button.
The Run Scheduler allows the client manager to see the resource scheduling change immediately after modifying a consumer event or after modifying a Team2Book Dashboard Settings.
Open In Teamup
The Clientdashboard scheduler menu UI allows the client managers a quick access to the fullscreen mode of the Teamup Calendar UI.
Client managers can enter fullscreen mode by pressing the Open In Teamup, so client managers can interact more easily with Teamup Calendar..
Open in Teamup As Admin
This is similar to the Open In Teamup button however, Teamup Calendar will be opened with administrative access level. Administrative access level gives the client manager full control on their Teamup account. Aside from the Teamup account management, it is recommended to perform all the other actions using the Team2Book dashboard. This ensures Team2Book and Teamup Calendar stay synchronized.
Client managers can enter fullscreen mode and Add / edit by pressing the Open in Teamup As Admin button.
Operations
In the Clientdashboard scheduler menu UI, a client manager can run and display in full screen..
To Update the Calendar
Steps to update the Calendar:
- Click the Run Scheduler button in the Clientdashboard scheduler menu UI.

- The scheduler runs and it might take a few minutes.

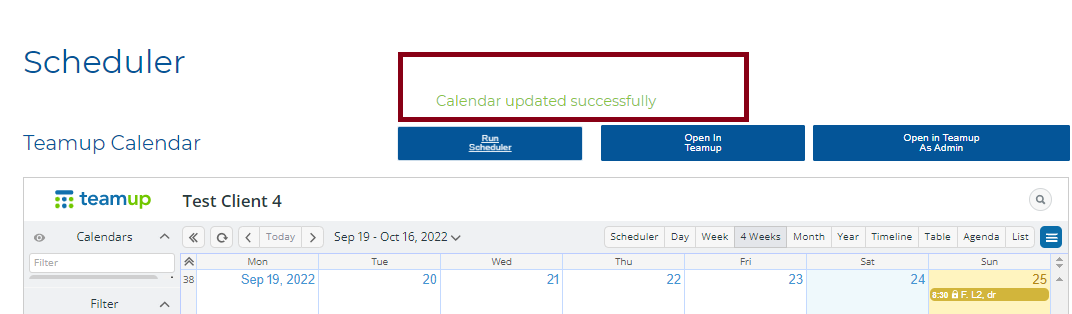
- The system updates the calendar, and you will get your newly updated calendar with message Calendar updated Successfully.

- The scheduler will update the schedule and Display the result of the latest Scheduler Run.
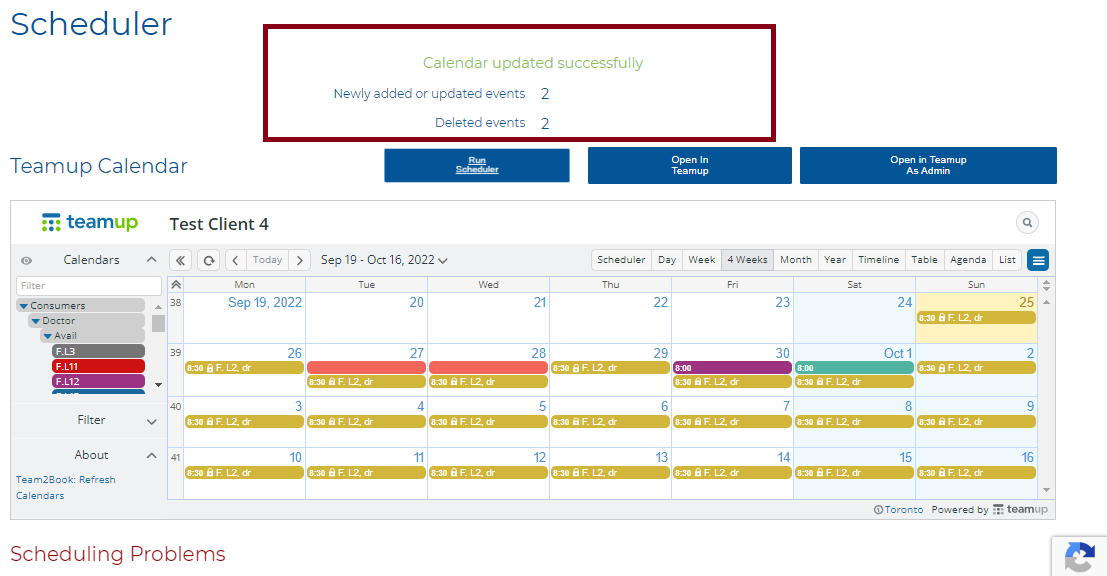
- The system will take you back to the scheduler menu, and you will get your newly updated scheduler with a message Calendar Updated Successfully.

- The errors will be presented below the scheduler and refresh every time the scheduler runs (which is every 15 minutes or whenever the client presses the run button).
The Run Scheduler can present automated error notifications to client managers and consumers about changes in shifts or cancellations after a successful update of a calendar.
Common scheduling errors
When client managers rundown of the latest changes as a result of running the Team2Book scheduler, errors are displayed on the bottom of the calendars on the client dashboard scheduler menu until the necessary corrections to the calendars are taken.
Let us look at some of the common scheduling errors.
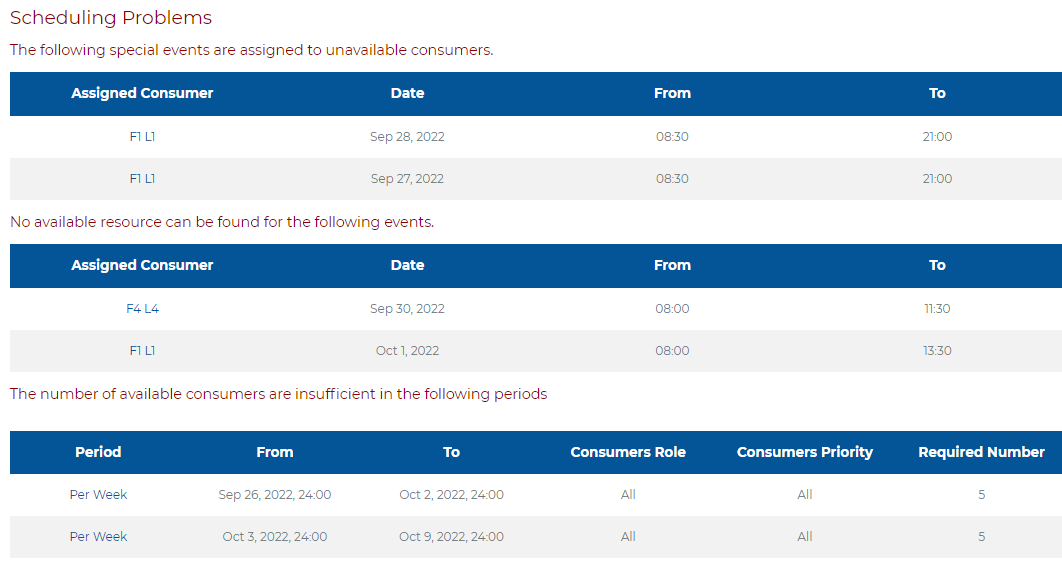
- The following special events are assigned to unavailable consumers.
This type of error happens when a client manager assigns special events to the non-available consumer. Consumers enter their availability or non-availability in their sub-calendars. For example, Consumer Patrick Brown entered a non-availability event on Sep 29 and 27, 2022 from 08:30 to 21:00. However, the client manager assigned him to a special event.

- No available resource can be found for the following events.
Lack of available resources leads to inadequate resource allocation. This means not finding the available resources for different events in the system. Failing to do so can result in a large bench of scheduling errors, derailing assigned consumers off their tracks.
This type of errors happens when:
- a client manager assigned consumer to non-available resource for the assigned event
- the availability time period is not available at that time

For example, Consumer Patrick Brown assigned on Oct 01, 2022 from 08:00 to 11:30 However, there is no available resource at that time so errors will be displayed on the client dashboard scheduler menu.
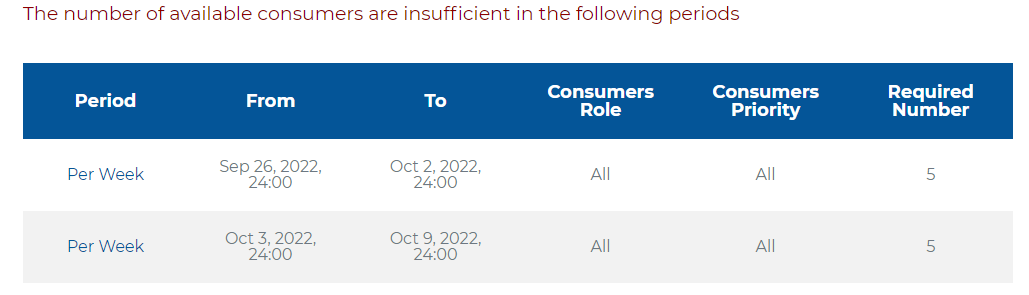
- The number of available consumers are insufficient in the following periods.
The required available number of consumers for any event are set in constraint sections of the client dashboard for any period. When the number of consumers required for the given period is insufficient, this type of scheduling errors will be displayed on the bottom of the client dashboard scheduler menu. For example, from Sep 26, 2022 to Oct 2, 2022 the number of available consumer is less than the required number of consumer (5) to accommodate the resource in the given time period.
To Display in Full Screen Without Add / Edit option
Steps to display in Full screen Without Edit Option:
- Click the Open In Teamup button in the Clientdashboard scheduler menu UI.

- After clicking the Open In Teamup button, a new window will open. The calendar pops up to open in a new window.

The client manager profile is located at the top right corner of your browser window. Your user rights are automatically linked to your login. These are assigned by the system administrator and define the possible working steps that you are allowed to carry out in the system.
- The Open In Teamup button opens a new window. The Open In Teamup attribute allows the client manager to see the teamup calendar that takes up the client manager’s entire screen.
The display of elements in the navigation and in the menu is also linked to the client manager and user rights. Client manager and User rights can only be changed by the system administrator.
To Display in Full Screen With Administrative Access
Steps to display in Full screen with Edit Option:
- Click the Open In Teamup As Admin button in the Clientdashboard scheduler menu UI.

- After clicking the Open In Teamup As Admin button, a new window will open. The calendar pops up to open in a new window. It open as Admin account
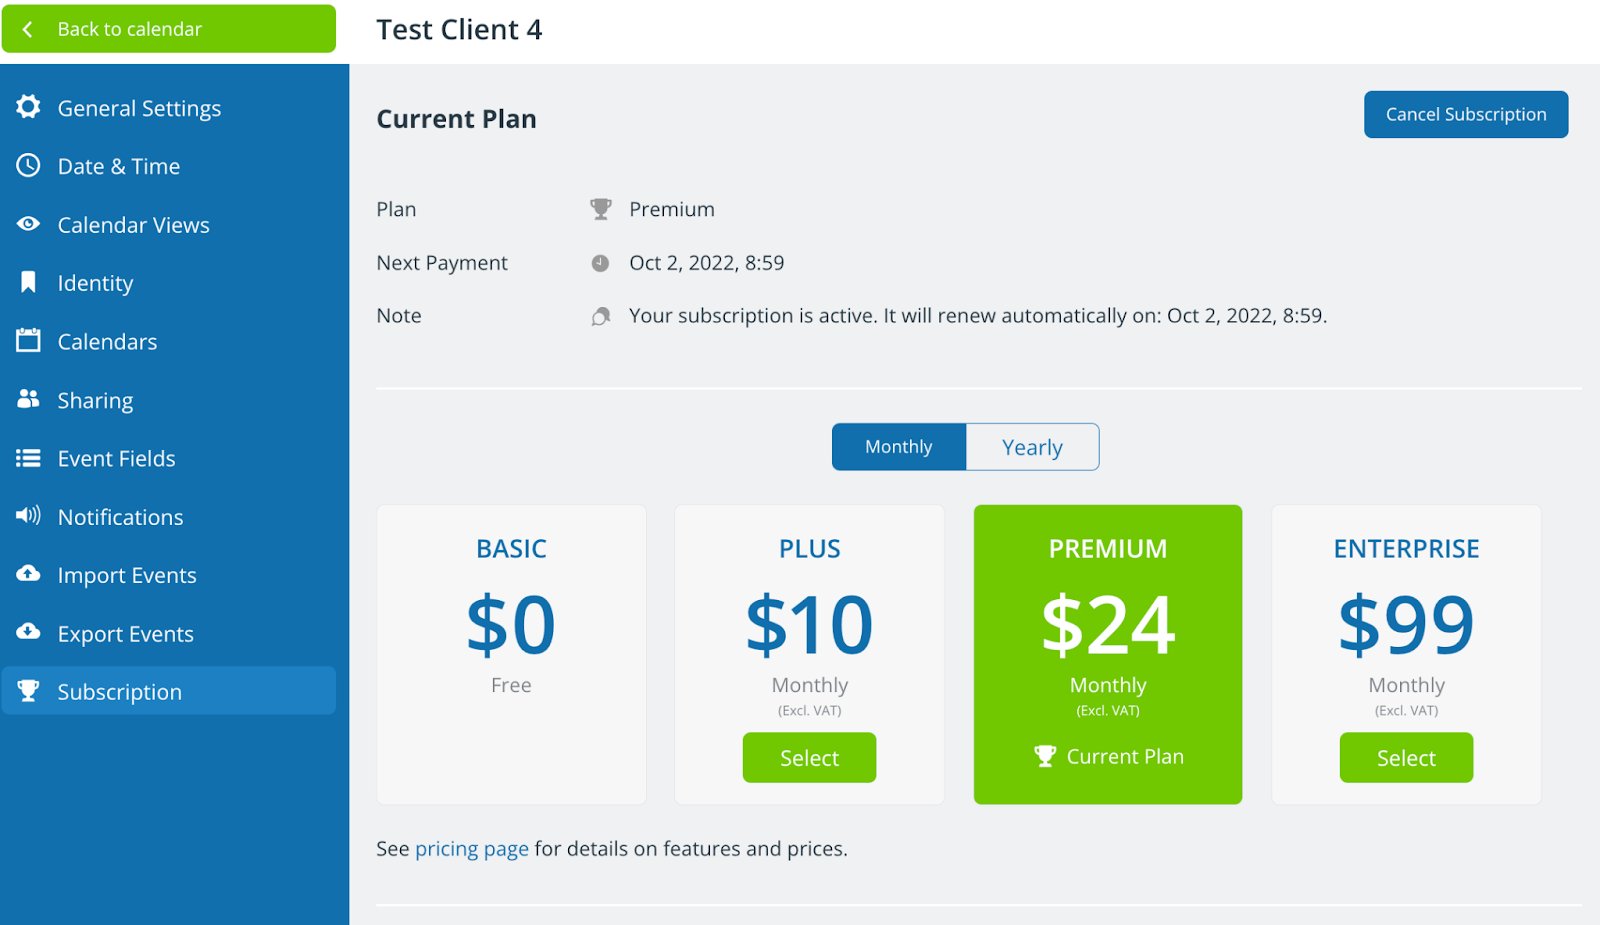
- When in the Open in Teamup As Admin, a client manager can manage his Teamup Calendar Account (Hamberger Menu -> Settings -> Subscription). All other actions should be perforrm using the client manager Teamup access (from the Open In Teamup button) or from the Team2Book Client Dashboard.
Always log out correctly using the logout button. Do not simply close the window. Other persons with access to your workstation could continue to work within a certain time under your login in the CMS.