This module is the user guide for Consumers Role and Consumers. To assign a resource to a consumer, you and Team2Book need to know their availability. Using these modules, the client manager can more easily access customer details and manage it, also the Team2Book scheduler can schedule the available resource to the consumer based on the information provided in the consumer availability. This module also contains step-by-step instructions guiding client managers through how to use this module and more. A consumer is often a team member but can be anyone or anything that needs a resource. Each consumer will be provided with a Teamup Calendar where the consumer can enter his/her availability or non-availability. Based on these availability or non-availability and based on priorities and preferences Team2Book will assign resources to available consumers.
By using this module, you will be able to:
- Group consumers by roles
- Add, update, and remove a consumer’s role and Consumer details.
- Allow the client manager the possibility to modify the role name, and abbreviation
- Define consumers priorities and preferences
Consumer Role
Introduction
The goal of Consumer Role is to group and categorize consumers on the basis of your needs. A particular consumer role may consist zero to many consumers. A consumer is not obligated to have a role. As a client manager, it’s up to you to decide how to best categorize the consumers you have available, figure out what additional consumers you might need, and decide how consumers are being grouped in your Consumer Role. The consumer role group can be based on profession or responsibilities, or any other way. For example a medical clinic may have 4 roles: Doctors, Nurses, Health professionals, Secretaries.
Here is how to get to the Consumer Role menu:
- Log into your client Manager Team2Book account
- In the homepage of Team2Book, tab the Members Area.

- Click Client Dashboard in the left side of the Client Dashboard menu.

- Click Consumer Roles. This is where you look at each consumer role in the consumer role table, consider its name and abbreviations, and count the number of consumers in each consumer role.
Attributes
Consumer Roles contain three attributes. Name, Abbreviation and Number of consumers of the consumer role.

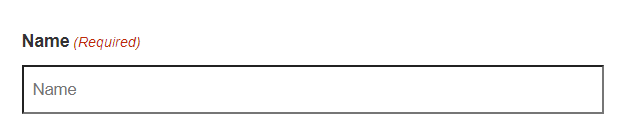
Name
Name is the required field in the consumer role dashboard. You can assign any name to your consumer group. The (Required) in front of the Name indicates that you must have to specify a name to your consumer group. The Name will come from your consumer team members’ professions, places where they are located, batch, position, etc.
Abbreviation
Abbreviation is a required field in the consumer role dashboard. You can assign any letter to your consumer group. The (Required) in front of the Abbreviation indicates that you must have to specify a letter to your consumer group.

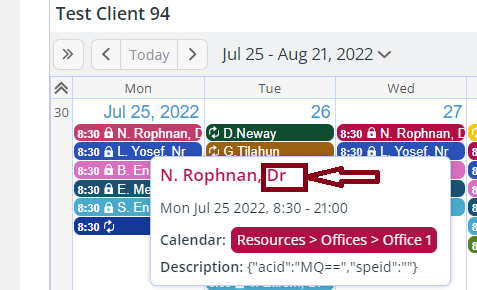
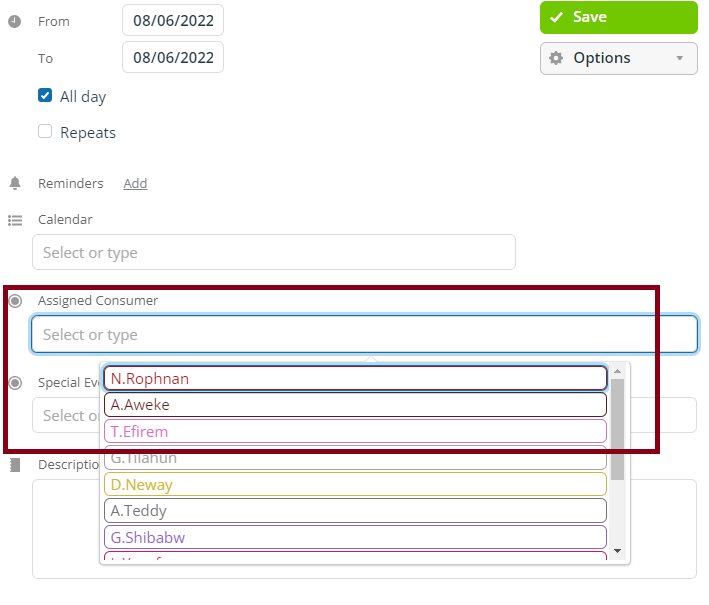
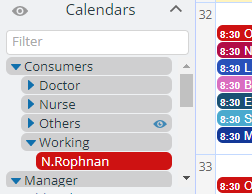
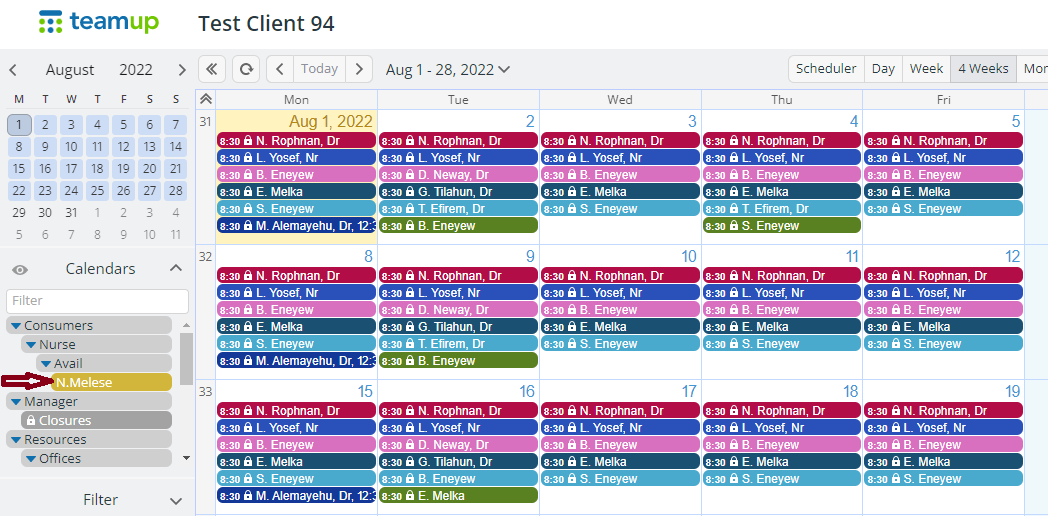
In the Teamup calendar, we use abbreviations in the resource event title. Here for example, Consumer N. Rophnan has assigned a consumer role as Doctor, and abbreviated Dr.
Validation
The length of a consumer role name needs to be at least 3, and the length of a consumer role abbreviation needs to be between 2 and 5. clicking on the Submit button a validation message will pop-up. For Example, let’s say the name of the consumer role is ‘La’, and the abbreviation of the consumer role is ‘L’.

After clicking the submit button, a validation message will pop-up saying there was a problem with your submission. Please review the fields below.
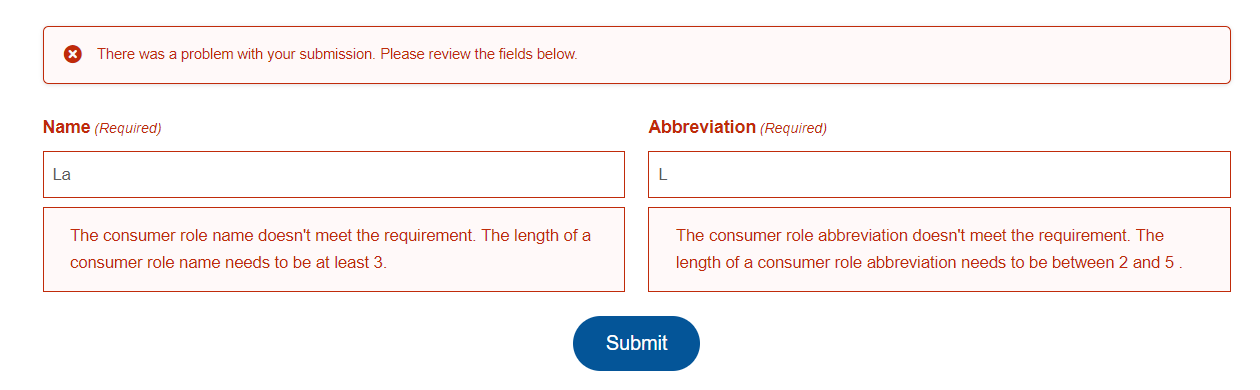
To meet the requirement the length of a consumer role name needs to be at least 3, and the length of a consumer role abbreviation needs to be between 2 and 5.
Number of Consumer
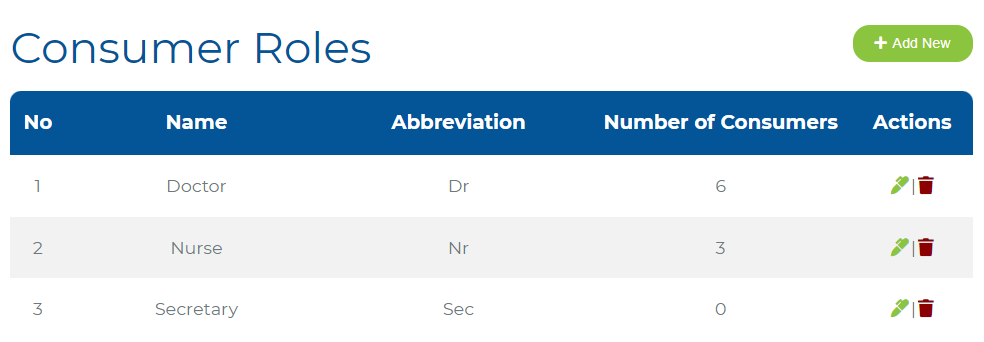
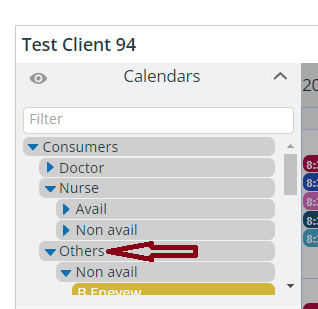
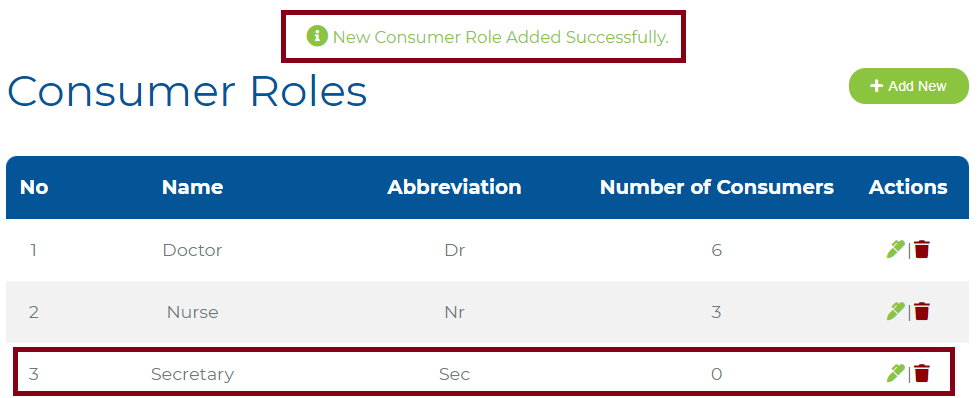
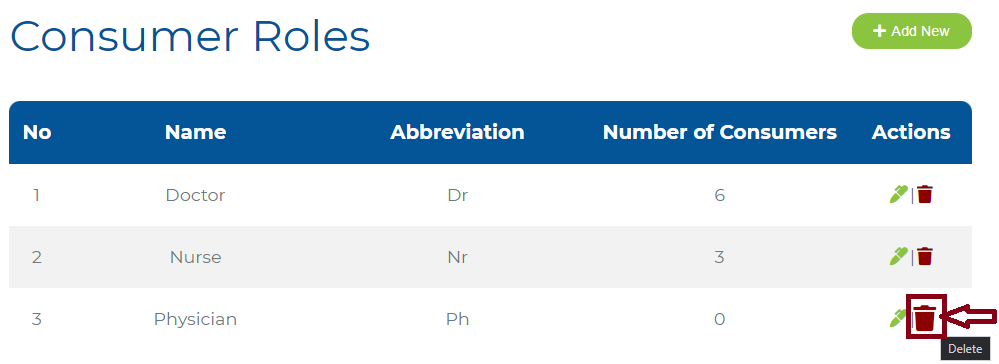
Number of consumers provides how many consumers are there in one consumer role group. For example, in the below figure, the consumer role named Doctor has 6 consumers, and the consumer role named Nurse has 3 consumers.
Teamup Calendar Hierarchy
In the Teamup Calendar, the sub-calendars are grouped by Consumer Role. The hierarchy is Consumer -> Consumer role -> Calendar Type -> consumer. Here for example, Consumers are grouped as Doctors and the consumer calendar type is based on availability type, and following a name of each consumer.

In the Teamup Calendar, consumers not assigned any specific consumer role are grouped under a default consumer role named Others.
Statistics
A consumer role is also a filter in the statistics module that enables you to filter consumer availability statistics data based on consumer role.
Operations
In the consumer role table, as a client manager you can add, update and remove a consumer role.
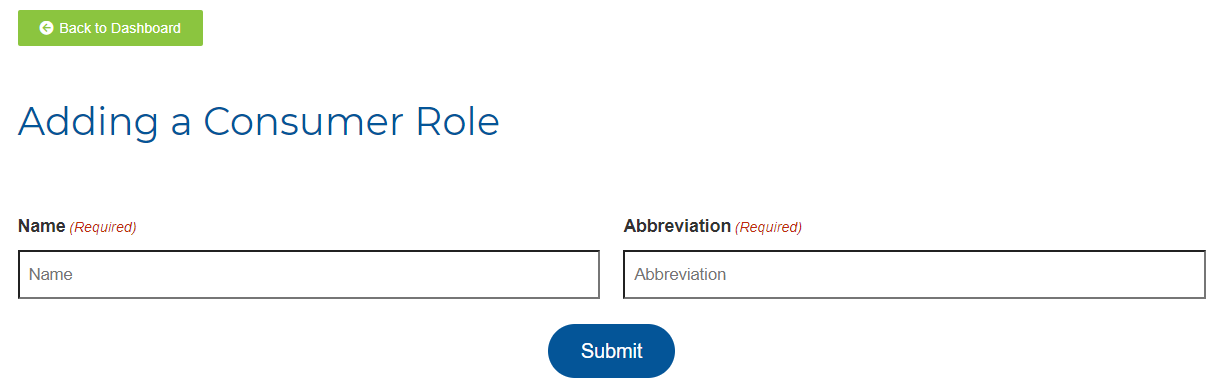
Adding a Consumer Role
Steps to add a consumer role:
- Click the Add New button in the client dashboard consumer role.

- When you click the Add New button a new Adding a Consumer Role page will pop-up.
If you don’t have any consumer role to add into the consumer role table you can click Back to Dashboard button anytime to get back to the consumer role table.
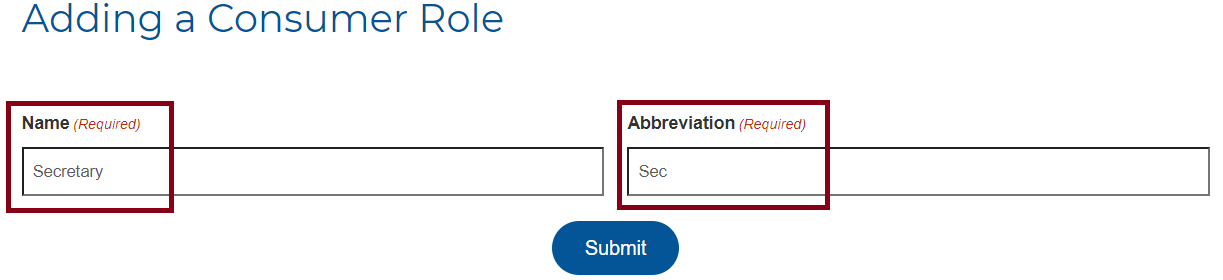
- As per your consumer role, you can specify a unique Name and Abbreviation. The name and abbreviations should be unique and don’t exist to other consumer roles. Here the Name and Abbreviation are required fields. Let’s say we want to add Sectreatry Consumer role in our consumer role table. Here the consumer role is named Secretary and we abbreviated the consumer role as Sec.
- After making sure we have specified the required name and abbreviation to the consumer role click the Submit button.

- The system will take you back to the consumer role table, and you will get your newly added consumer role with a message New Consumer Role Added Successfully.
Updating a Consumer Role
Steps to update a consumer role:
- Select the consumer role, you want to update and click the edit / update button. When you mouse over in the right end of the selected consumer role, and the cursor is in the edit/ update button update information will display.
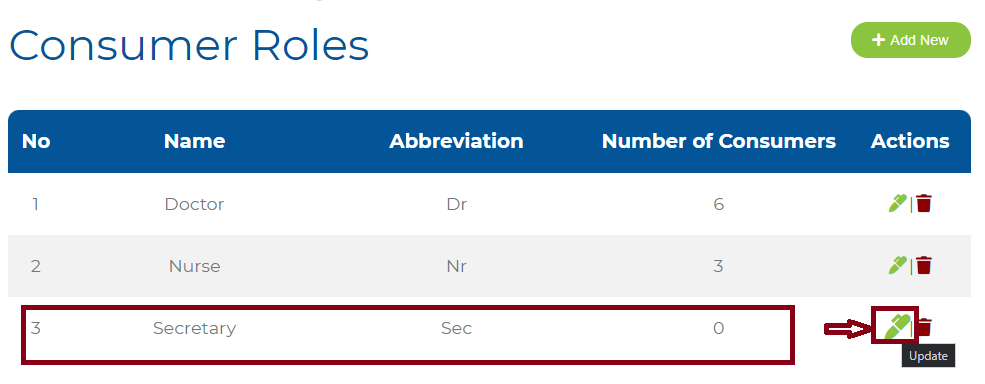
- A new page will pop-up after clicking the Update button.
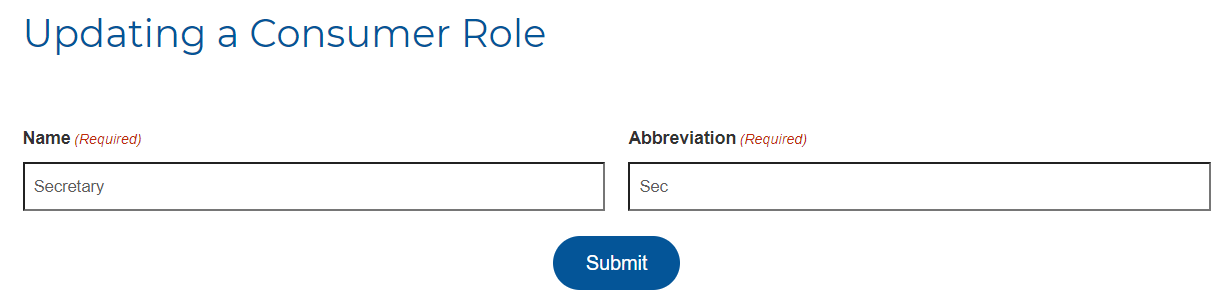
- You can edit or update the Name of your consumer role and Abbreviation of your consumer role on the basis of your needs.

- After editing or updating your Name and Abbreviation information of the consumer role, Click Submit.
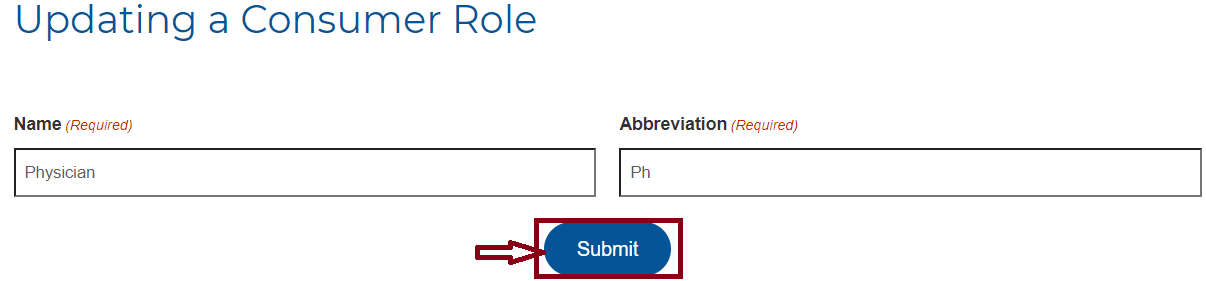
- The system will take you back to the consumer role table, and you will get an updated consumer role with a message Consumer Role Updated Successfully.

Removing / Deleting a Consumer Role
Steps to remove or delete a consumer role:
- Select the consumer role, you want to remove or delete in the consumer role table and click the Delete button. When you mouse over in the right end of the selected consumer role, and the cursor is over the remove / delete button Delete information will display. For example, Let’s say we want to delete or remove the third row consumer role in the consumer role table.
- After clicking the remove / delete button, a new information page will pop-up.
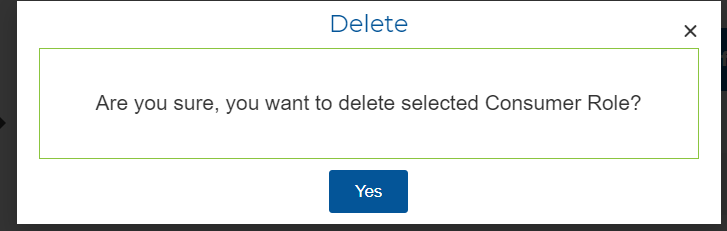
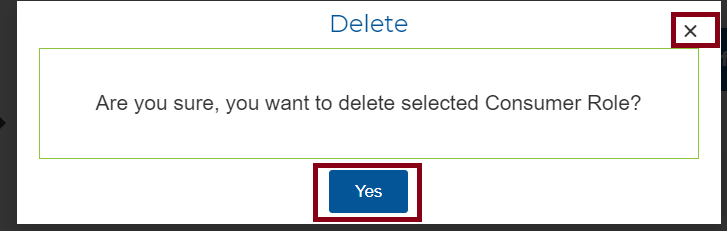
- If you are sure to remove or delete the selected consumer role, you can click the Yes button. If you’re not sure about the selected consumer role you can cancel by clicking the X button in the new pop-up page and will return you to your consumer role table.
- When you click the Yes button, the system automatically removes or deletes your consumer role in the consumer role table.

- You will get back to the consumer role table with a message Consumer Role Deleted Successfully.

All consumers under the removed or deleted consumer role will be moved or get assigned to Others Consumer role.
Consumers
Introduction
The main objective of a consumer entity is to manage a consumer and to add, modify or update, and delete / remove a consumer. A consumer is any individual who uses or utilizes a resource, and any one who wants to be assigned a specific available resource. They can be staff members, individuals or employees of an organaziations. E.g. Employees like health-care professionals in a clinic that needs to use offices, which is a resource.
Here is how to reach the Consumers menu:
- Log into your client Manager Team2Book account
- In the homepage of Team2Book, tab the Members Area.

- Click Consumers in the left side of the Client Dashboard menu.

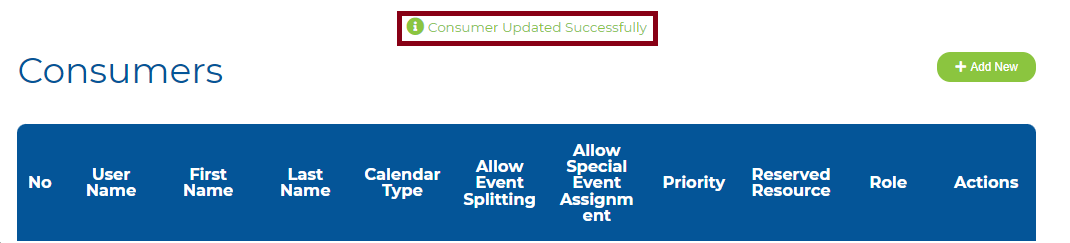
Attributes
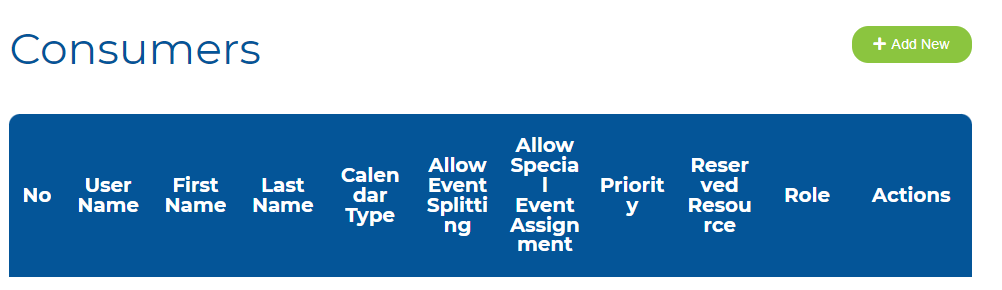
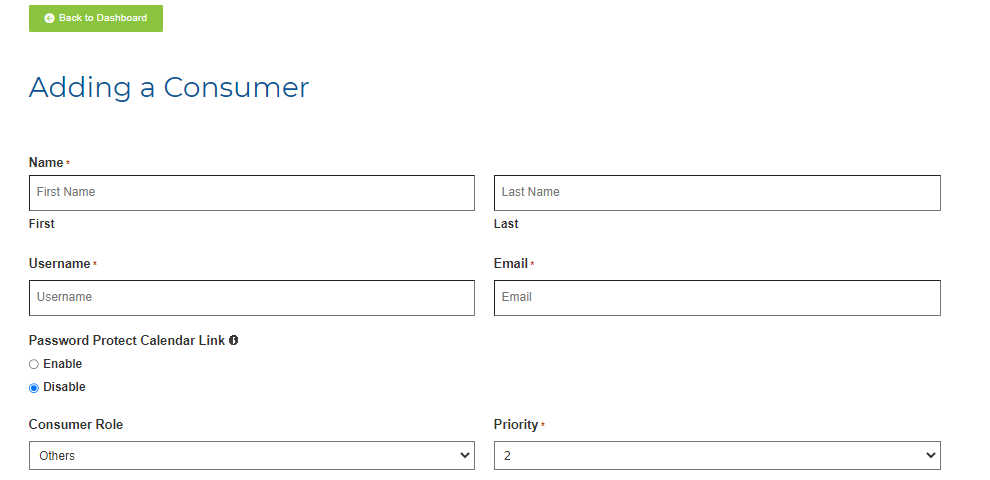
A resource entity has the following attributes:
- Name
- User Name
- Password Protect Calendar Link
- Consumer Role, Priority
- Reserved Resource
- Resource Preference
- Event splitting
- Special Event Assignment
- Calendar Type
- Calendar Color
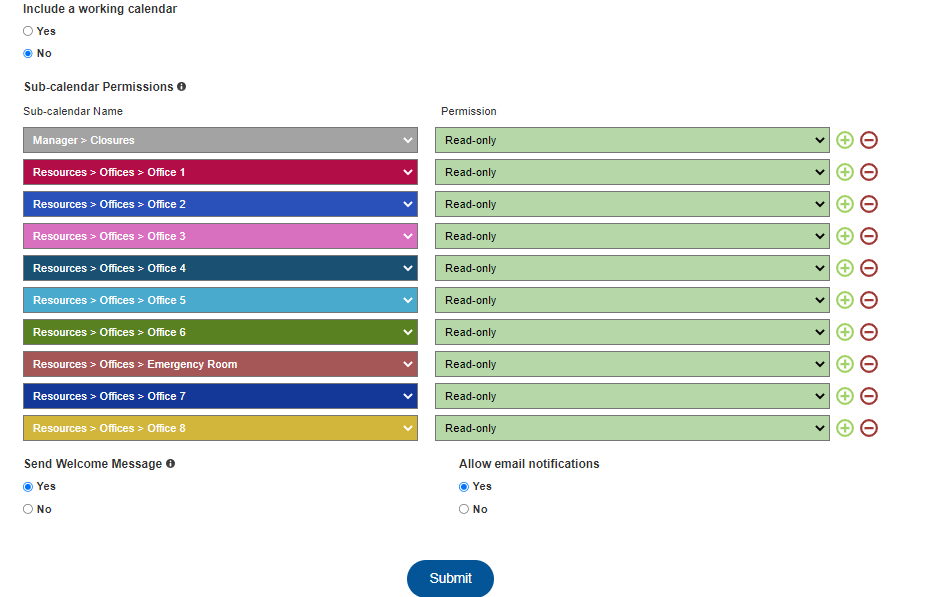
- Working Calendar
- Sub-calendar Permissions
- Welcome Message, and Email Notification.
In this section, Consumer entities are represented.
Name
Name is a required field in the consumer attribute. You can assign any name to each consumer, and it doesn’t have to be a unique name here. If you have two or more consumers with similar names, you can assign a similar name to your consumer as you wish, however it should contain the First and Last Name of a consumer.

User Name
Username is also a required field in the consumer entity. It should be unique.

By default, the system automatically fills by taking the first letter of your consumer first name and the full name of your consumer last name with a dot between. As a client manager, you have the privilege to replace the default username as you need. For example, if we specify the first Name of our customer Messi, and his last Name Alemayehu, our system automatically fills the username with M. Alemayehu.

Validation
As we have noted earlier, username should be unique, if we assign an existing username taken by other consumers, validation sends to review the username field.

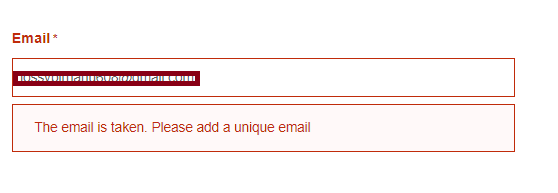
The email field is a required field in the consumer entity. It should be unique like a username. There is no auto fill in the email field, the client manager can specify any unique email to his consumer.

Validation
Validation input requirement is asked by the system if you haven’t specified a unique email.
Password Protect Calendar Link
Team2Book creates a Teamup Calendar access link (calendar link) for each consumer. By enabling this feature you can protect the calendar link using a password to make the calendar link private.
When you Disable password protect calendar link, your calendar link can be without a protection and anyone with the link can access your calendar.
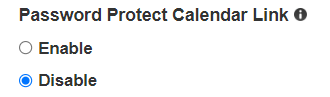
You can Enable this to create a password protected calendar link for this consumer. When you enable this feature, you will be asked to input a password.

Validation
When you set a password to protect a calendar link, the password should be a minimum of 8 characters, at least one letter, and one number.

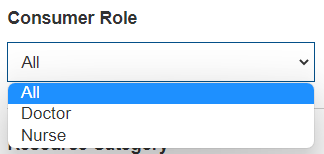
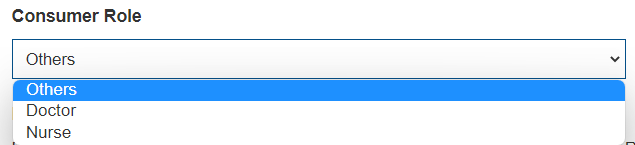
Consumer Role
Consumer role is a group of consumers assigned a role on the basis of a client’s need to use the available resource. Every consumer in your consumer list needs to have a role assigned to it. A consumer can have only one role. You can select any one of a consumer role to assign your consumer. By default, the system selects Others consumer roles.
Priority
The scheduler schedules the available resources based on the consumer priority and preferences. Priority has a number between 1 to 10. When the priority is 1, it means the consumer has a high priority and a reserved resource. When the priority is between 2 to 10, it means the consumer has no priority on any resource (I.e. no reserved resource). The consumer has only resource preferences. This means consumer with priority 1 will be assigned a resource first then consumer with priority 2 will be assigned a resource and so forth. As a client manager, you have the right to assign the priority number to your consumer as per your need.

Reserved Resource
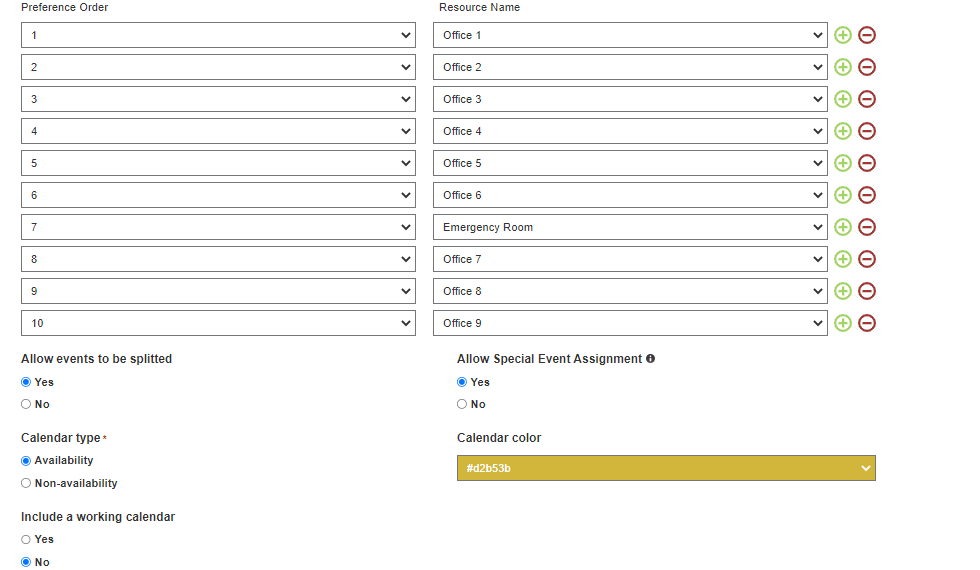
When you choose priority number 1, the reserved resource only will display. In this case the consumer will have a reserved available resource. For example, here Office 8 is a reserved resource for a priority 1 consumer.

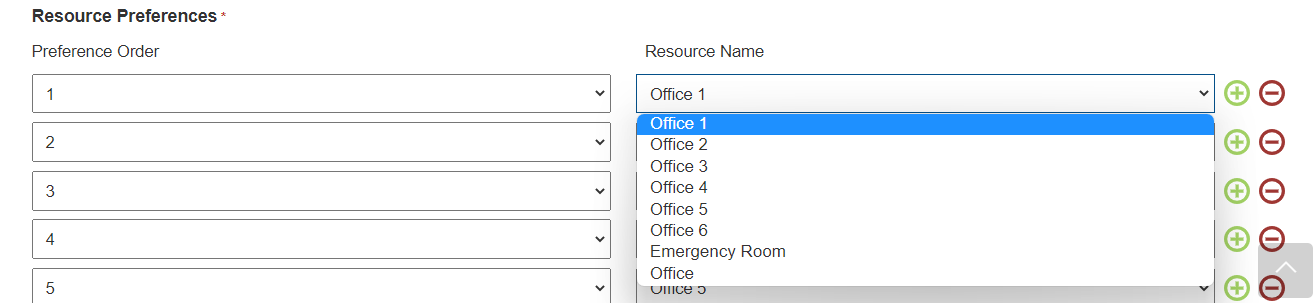
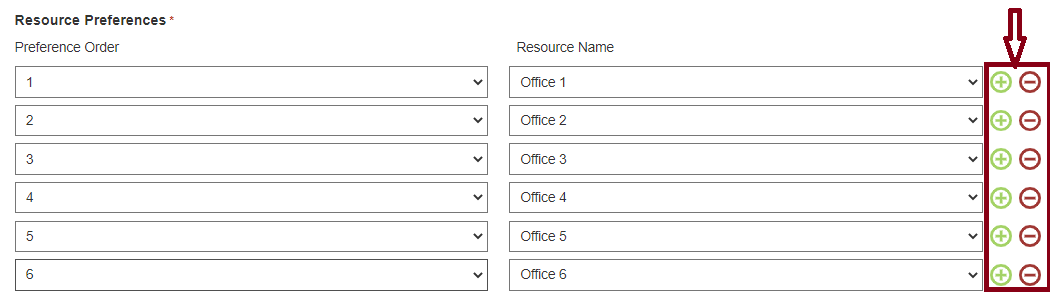
Resource Preference
When you choose priority other than 1 (2 to 10 priority number), the resource preference field will display. The resource will be assigned based on their resource preference.

In the resource preference, you can choose 1 type of resource only. You can’t choose the same resource name more than 1.
Priorities and Preferences Example
In a medical clinic, each doctor may have priority 1 and a reserved resource to make sure they always work in the same office whenever they are available to work.
A nutritionist may have priority 2 and therefore no reserved resource. This nutritionist, may have the preferences set as follow:
Resource Preference Order 1: Office C
Resource Preference Order 2: Office D
Resource Preference Order 3: Office A
A psychologist may have priority 3 with the following preferences:
Resource Preference Order 1: Office D
Resource Preference Order 2 Office B
Resource Preference Order 3: Office C
Here is the result:
- Whenever the doctors are working, they will be working in their reserved office.
- Whenever the nutritionist with (priority level 2) is working, she will work in office C unless the office is taken by a doctor. Otherwise, she will be working in office D and so forth.
- Whenever the psychologist (priority level 3) is working, he will be working in Office D, unless this office is used by a doctor or a nutritionist. The nutritionist has a higher priority than the psychologist, therefore, she will be assigned an office first.
Event splitting
When there is no resource left for a given consumer event on a given day, the scheduler shall try to fit the consumer event by splitting it in half. As a client manager you can configure the split time. The event will be splitted into two. i.e before lunchtime and after lunch time (morning and afternoon time). The scheduler only tries to split consumer events that can be split. The scheduler tries to find time availability for the 2 halves of the consumer event.
When you want to authorize event splitting for a consumer Which means, for instance, assigning a consumer to one resource in the morning and to another resource in the afternoon. In this case, you can select the Yes radio button. Event splitting further optimizes the use of your available resources. However, the consumer must accept to use different resource on a single day.
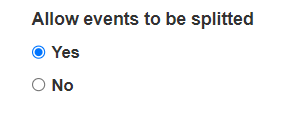
If you don’t want to authorize event splitting for a consumer, you can select the No option radio button in the Allow events to be splitted.

For example, in a medical clinic, the client manager may decide to not allow event splitting for the doctors but authorize it for nurses.
Special Event Assignment
A special event is defined as an event that the client manager wants to assign to a specific consumer. For example, you may want to assign a specific consumer to a night or weekend shift. To proceed, the client manager will add a Teamup event using the Special Event Type, the date/time and the consumer to the special event sub-calendar.
Condition
Special Events requires a Teamup Calendar Premium or Enterprise plan. Please see our Special Event Module for more details.
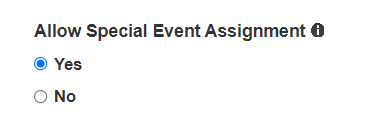
When we select Yes in the allowed special event assignment, we are enabled to assign the consumer to special events. The consumer will be added to the list of consumers that can be assigned to special events.
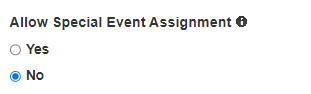
If you don’t want to enable assigning the consumer to special events, you can select No radio button in the allow special event assignment.
Calendar Type
Calendar Type is a required field when you set up a consumer. Calendar type has Availability and Non-availability calendar options. For consumers working most of the time, it might be more convenient to enter non-availability in their Teamup sub-calendar (e.g. the days they are not working). For consumers present only a few days a week, it might be more convenient to enter Availability (e.g. days present at the office).
Example
John only works on Mondays. He prefers to enter only his availability in his Teamup sub-calendar. The client manager will then select Availability as the Calendar Type for the consumer John. Whenever John enters an event in Teamup then Team2Book will know this is an availability event and will try to assign John to a resource. No resource will be assigned to John if he does not enter an event in his Teamup sub-calendar.
Sarah works 4 days a week. It is more convenient for her to enter only the days she is not working in her Teamup sub-calendar. Therefore the client manager will select Non-availability as the Calendar Type for consumer Sarah. Team2Book will always try to assign a resource to Sarah except on days she creates an event (i.e. non-availability event) in her Teamup sub-calendar.


The Teamup sub-calendars are grouped by Calendar Type.
Calendar Color
In the Teamup Calendar, each consumer has a color. You can assign specific sub-calendar colors to each consumer. There are 48 COLOR options to assign your consumer.

If you want, you can use the sub-calendar colors to help you group consumers.
Working Calendar
A working calendar is a special calendar used mainly for consumers that will like to know when they have a resource assigned. Then the consumer can link this Teamup sub-calendar to his/her personal calendar software.
Example
Steeve uses Google Calendar for his personal and family activities. Steeve is working 2 days a week at the office. Like the other members of the team, Steeve uses Teamup Calendar to enter the days that he is working at the office.
Steeve would like to know by looking at his Google Calendar, the days he is working.
To do this, the client manager will include a working calendar for the consumer Steeve. A new Teamup sub-calendar will be created and will indicate the days Steeve is working at the office. Steeve can then link this working sub-calendar to his personal Google Calendar.
Outbound iCalendar Feeds
To view a Teamup sub-calendar in other Calendar software, here are the instructions: https://calendar.teamup.com/kb/subscribe-to-teamup-icalendar-feeds/
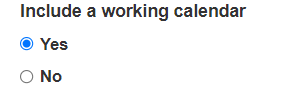
When we select Yes to include a working calendar, the system invites us to select which events we want to show on the working calendar.

By default, the system allows us to show all the events including the special event on the working calendar. We can customize the event type based on our needs to include on the working calendar.
For example, if Steeve only want to see the days assign to a special events the working sub-calendar (e.g. working on weekends, working on a night shift or when working at the emergency room), then the client manager will select Only special events under Events to show on the working calendar.
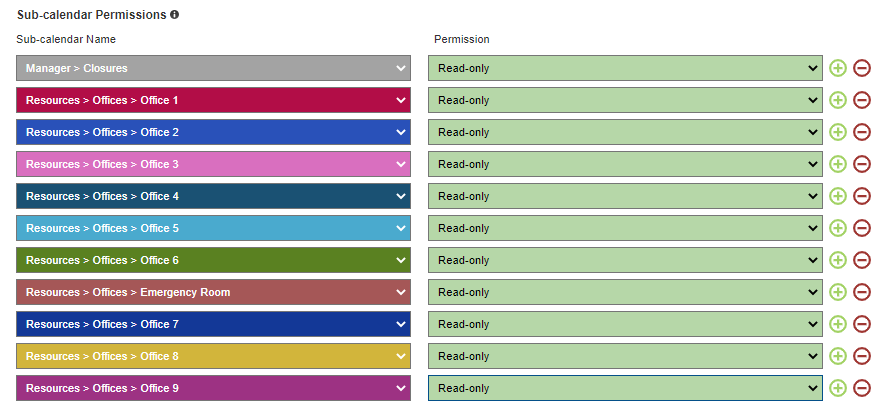
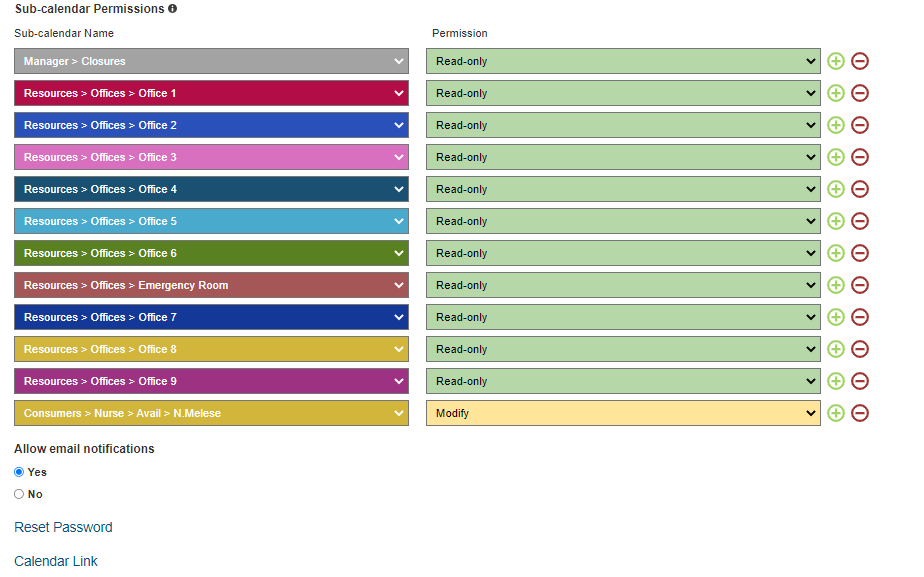
Sub-calendar Permissions
By default, each consumer will have Modify permission to his/her availability/non-availability sub-calendar and Read-Only access to all the other sub-calendars. For some large or medium organizations, it might be overwhelming to see all the other consumers’ sub-calendar. For other organizations, one designated person will enter availability/non-availability for a group of consumers. The client manager can change the permissions to each sub-calendar for each consumer.
Each consumer has limited (No Access, Read-Only, Modification) access to the sub-Calendars
Every consumer has one consumer sub-calendar and a consumer sub-calendar can be owned by one consumer. The sub-calendar permission fields contains the sub-calendar name and permission.
- Field Sub-calendar Name : Name of the sub-calendar.
- Field Permission : The available permission types are Read-only, Modify, and Not Shared.

By default, all resources have read only permissions. Client managers can have permission to modify the sub-calendar. Consumers can only read or view the sub-calendars, they have no access to modify the sub-calendars.
There is a plus and minus sign on the right side of the sub calendar permission.
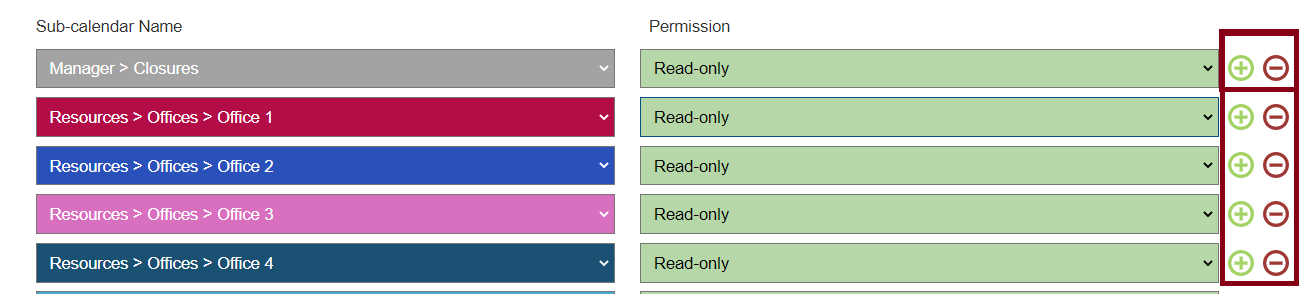
Use the + and – buttons to add and remove a sub-calendar permission respectively.
Validation
Warnings
The available permission types are Read-only, Modify, and Not Shared. Usually User requires Read-only access to Resource sub-calendars. As a client manager when you give access permission to the consumer, the system provides you a warning if you give a wrong available permission to the consumer.
The sub-calendar Manager->Closures can have a read only permission in the sub-calendar permission, however if you give permission to modify the resource for closures, the system will provide you a warning with a message A Modify permission is given to the Business sub calendar.

If you wrongly give No shared access to a resource, the system will display a warning message on the above side of the sub-calendar permissions.
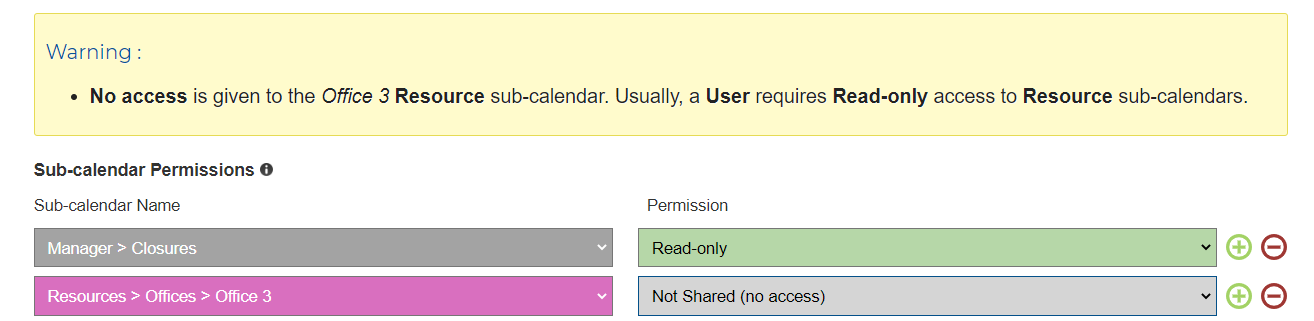
Errors
A consumer cannot have Modify permission to a resource or a working sub-calendar.
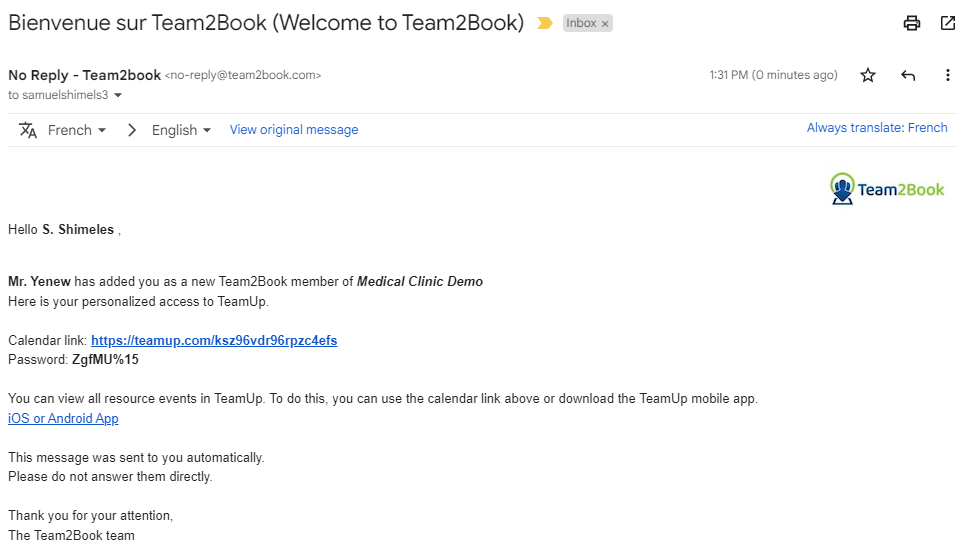
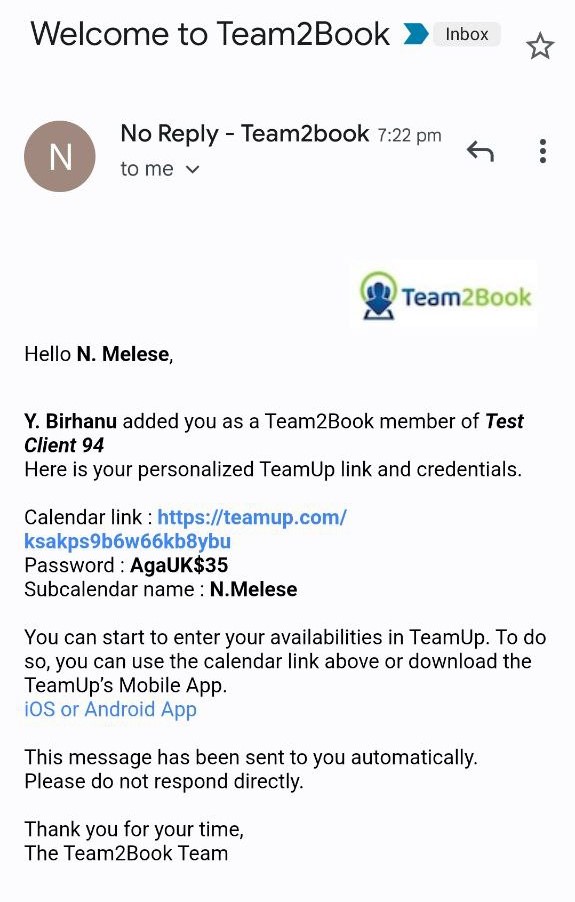
Welcome Message
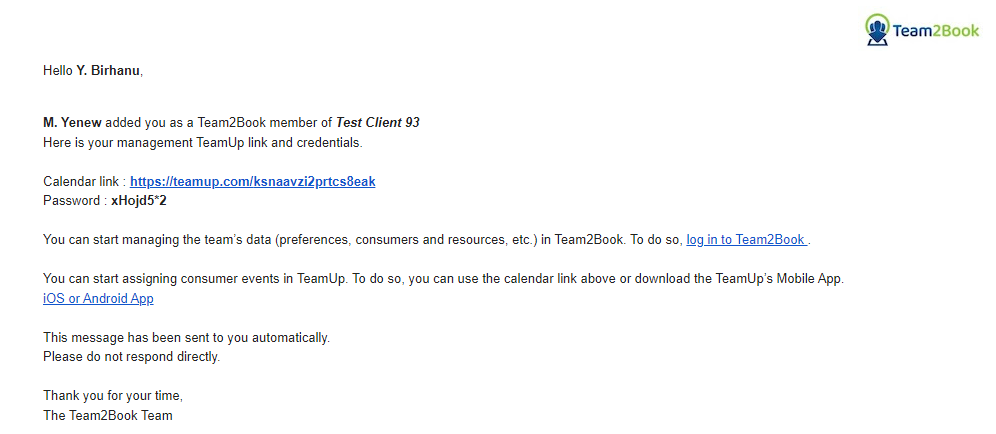
Using this entity, you can send a welcome message via email to the user. The message contains the consumer calendar link, credentials, and a link to download the TeamUp’s Mobile-App.

The sample welcome message is below sent to the client manager. Using the link a client manager can start managing the team’s data (preferences, consumers and resources, etc.) in Team2Book.
Email Notifications
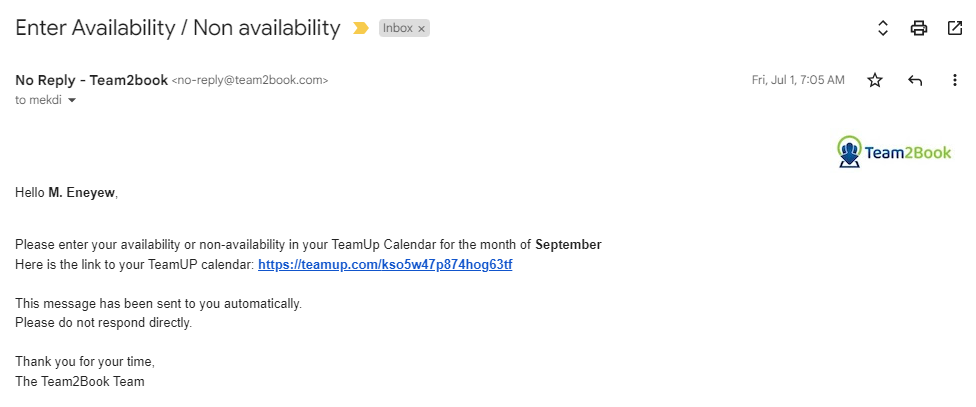
Using this attribute, Team2Book will send notifications or reminder via email to the consumer.

The system sends notification to the given consumers to request them to enter their availability/non availability for the next period.
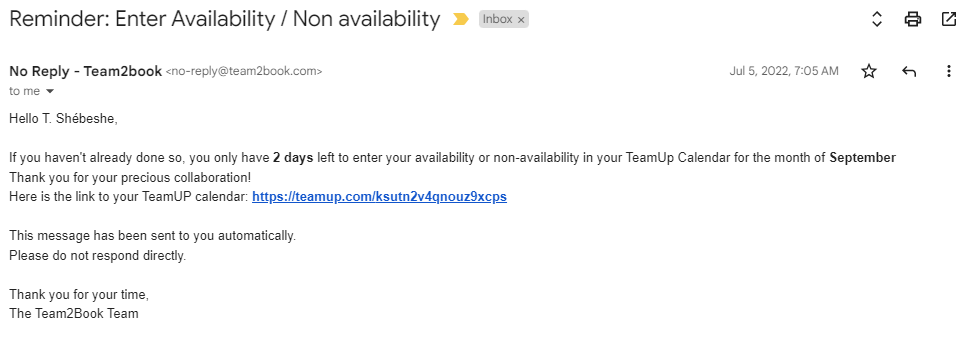
The system also sends a 2nd notification (i.e. a reminder) to the consumers to request them to enter their availability/non availability for the next period.
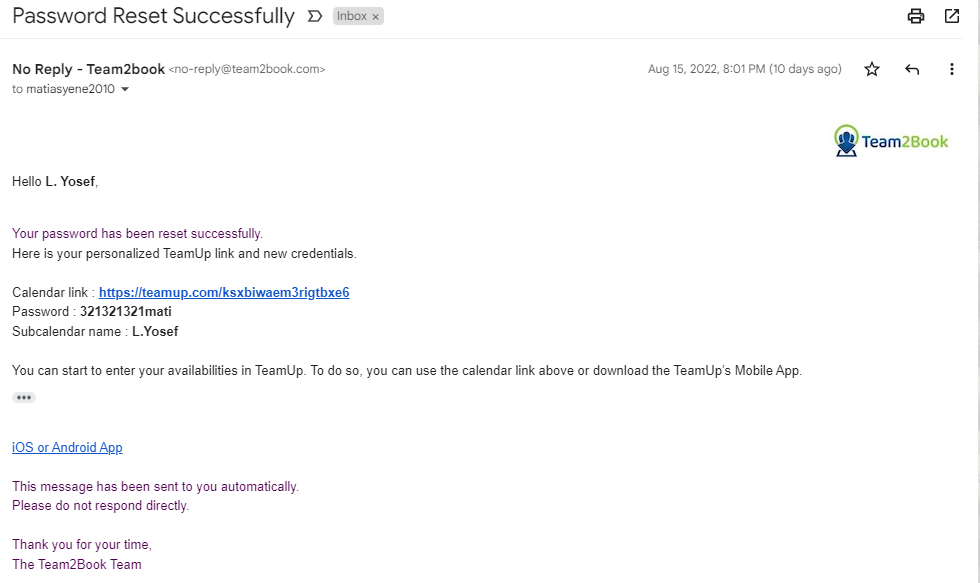
Here is the notification the consumer will receive when the client manager reset the consumer’s password.
A viewer will receive a similar welcome message.
A client manager will receive additional notifications scheduling problems and resolution.

Operations
Adding a consumer
You’ll need the consumer’s Name and Email Address.
Steps to add a consumer;
- Click the Add New button in the client dashboard consumer table.

- When you click the Add New button a new Adding a Consumer page will pop-up.

If you don’t have any consumer to add into the consumer table you can click the Back to Dashboard button anytime to get back to the consumer table.
- You can specify Name, Username, Email. Let’s say we want to add Netsanet Melese as a consumer.

You can replace the username as you like, but the system automatically puts the first letter of the first name and all letters of the last name with a dot in between.
In the Password Protect Calendar Link, now let’s enable this to password protect the user calendar access link. You can select either disable option as you need.

In the Consumer Role, let’s say the role of ‘Netsanet’ is a Nurse. As a client manager, you can select and assign any role for your consumer as per your need by clicking the Consumer Role menu.

In the Priority, when we want to give high priority, and if we have reserved resource priority 1 will display by default. For now let’s say we have office number 9 as an available resource. When we select priority number 1, the resource displays automatically.

Let’s change the priority to any number between 2 to 10. Here the resource preference will automatically display.

As a client manager you can decide to adjust the priority and preferences of each consumer.
We can assign the reserved resource to ‘Netsanet’, or we can select other priorities from 2 to 10. Let’s say the priority we want to give to ‘Netsanet’ is priority number 2. This is a priority without a reserved resource. In this case we can select the resource preference for the consumer we have. We have a resource preference order from 1 to 10. When we assign the resource preference order 1, the consumer will have the highest preference to the resource, and when we assign the resource preference order 10, the consumer will have the lowest preference to the resource..

On the right side of the resource preference there are resources with their name. We can match the preference order with the resource we have to the consumer. We can select the resource name by clicking the option tab in the resource name.
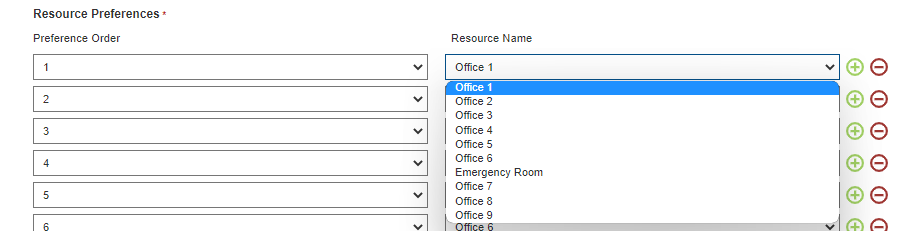
Let’s assign resource preference order 1 for resource office 1, and resource preference order 2 for resource office 2. And finally we choose resource preference order and resource like this for ‘Netsanet’.

Using the plus and minus options on the right side of the resource preference we can add and delete a resource preference.
In the Event splitting, if we want to split the event for the consumer we can select the Yes radio button. In case some resources will be available in the morning or in the afternoon shift, we let the scheduler schedule the consumer to the available shift. In the Special Event Assignment, if we want the consumer to be assigned for a special event type we can select the Yes radio button in the allow special event assignment. Let’s say we want ‘Netsanet’ to split the event and we want to assign a special event type.

In the Calendar Type, we can let our consumer fill their availability time or non-availability time. Some consumer will be easy to provide his / her availability time instead of provide his / her non -availability time to save time in the process. Let’s say we select ‘Netsanet’ to provide availability time to use the available resource. In the Calendar Color, we can select any color for the consumer.

In the calendar color, A consumer must have one consumer sub-calendar and a consumer sub-calendar can’t exist without a consumer. Let’s assign a sub calendar color #d2b53b color for ‘Netsanet’.

In the Working Calendar, we can select No if we don’t want to include the working calendar.

We can also select Yes if we want to include the working calendar, and we have to select which events to be shown in the working calendar. By default , the system will show all events including the special event in the working calendar. Let’s say we want to show all events in the working calendar for ‘ Netsanet’

In the Sub-calendar Permissions, we can give access permission to the consumer. By default, all resources have read only permissions. We can change and assign modify and No shared access permission to the consumer. Usually, consumers should have read only permissions to all resources. We want to give read only permissions for ‘Netsanet’.
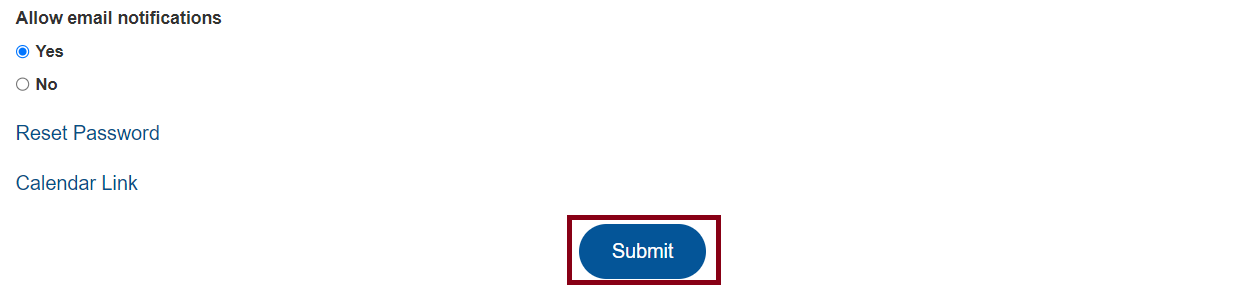
After this if we want to send a Welcome Message, and Email Notification to your consumer. Let’s say we want to send a welcome message, and Email notification to ‘Netsanet’, so we select the Yes radio button for both.

- After making sure we have specified the detailed information to the consumer, click the Submit button.

- The system will take you back to the consumers table, and you will get your new added consumer with a message New Consumer Added Successfully.


- The consumer will receive a welcome message via email automatically with Teamup link and credentials.
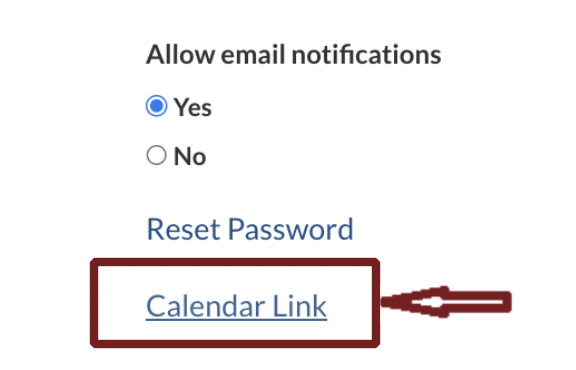
- When the client manager mouse over the Calendar Link the consumer calendar link should be displayed in the browser lower left corner (depends on the browser you are using). If the client manager clicks on that link, the Consumer Availability/Non-Availability access link will be opened in a new browser tab.
Once a new consumer is added, a new calendar is added in Teamup Calendar.
Updating a Consumer
Steps to update a consumer;
- Select the consumer, you want to update and click the edit / update button, When you mouse over in the right end of the selected consumer, and the cursor is in the edit/ update button update information will display.

- A new page will pop-up after clicking the update button,

- You can edit or update the consumer attributes on the basis of your interest. You can reset a password associated with the consumer by using the Reset Password link. Let’s say we want to modify the ‘Netsanet‘ calendar type.

- After editing or updating the consumer information, Click Submit
- The system will take you back to the consumer table, and you will get an updated consumer with a message Consumer Updated Successfully.

- If notifications are enabled for the consumer will receive notification when it is time to enter his / her non-availability for the next period.

Removing / Deleting a Consumer
Steps to remove or delete a consumer:
- Select the consumer, you want to remove or delete and click the remove / delete button. When you mouse over in the right end of the selected consumer, and the cursor is in the remove / delete button delete information will display.

- After clicking the remove / delete button, a new information page will pop-up.
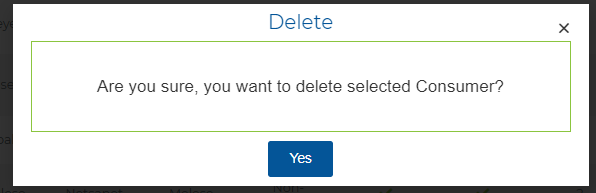
- If you are sure to remove or delete the selected consumer, you can click the Yes button. If you’re not sure about the selected consumer you can cancel by clicking the x button in the new pop-up page and will return you to your consumer table.
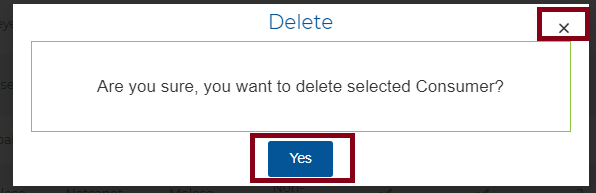
- When you click the Yes button, the system automatically removes or deletes the consumer in the consumer table. You will get back to the consumers table with a message Consumer Deleted Successfully.

As a client manager, you can now add, update, and delete a consumer, also you can group consumers as per your needs.